
Overview
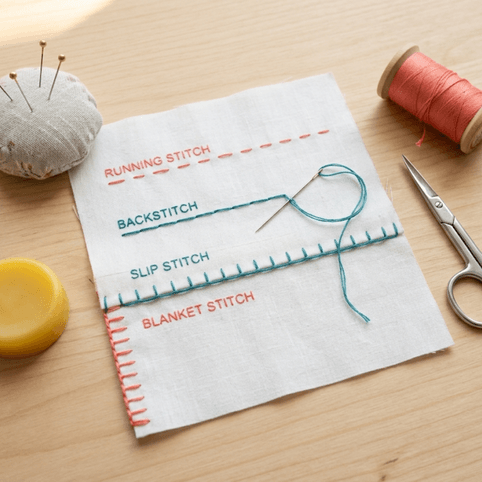
The seven basic sewing stitches every beginner needs are the running stitch, backstitch, basting stitch, slip stitch, whip stitch, blanket stitch, and catch stitch. Start with the running stitch and backstitch; they handle 80% of hand sewing. Add finishing stitches as projects require them. No sewing machine needed.
What Are the Seven Basic Sewing Stitches Every Beginner Should Learn?
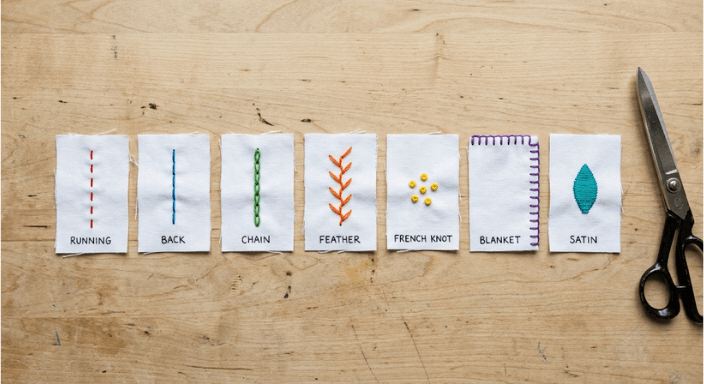
Seven hand stitches cover nearly every situation you will face when sewing by hand: the running stitch, backstitch, basting stitch, slip stitch, whip stitch, blanket stitch, and catch stitch.
These basic sewing stitches fall into three categories. Construction stitches (running, backstitch, basting) join fabric. Finishing stitches (whip, blanket, catch stitch) prevent fraying and secure hems. The slip stitch closes seams invisibly.
As one reader shared on Sewing.com: “Not only is it information overload, but you have to practice each one as well.” That feeling is normal. Start with the running stitch and backstitch. The rest can wait until a project calls for them.
For foundational skills, including machine sewing, see Sewing for Beginners: 25 Powerful Tips.


This article contains affiliate product recommendations. All products are flagged pre-live pending hands-on editorial testing. Sewing.com earns from qualifying purchases.
How Do You Sew a Running Stitch and Backstitch by Hand?
The running stitch is the fastest hand stitch for simple seams, and the backstitch creates the strongest hand-sewn seam available without a machine.
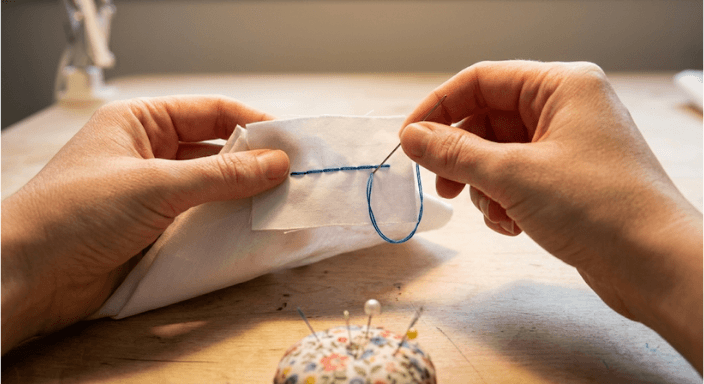
The running stitch is the foundation of all basic sewing stitches. Push your threaded needle up through the fabric, then back down about 1/4 inch ahead. Repeat, keeping stitch length and spacing even. You can load several stitches onto the needle before pulling through to work faster. Use it for basting, gathering, and light seams.
If your running stitch puckers, your stitches are too tight, or the fabric is not held flat. Loosen your thread tension and hold the fabric smooth as you work.
The backstitch is the strongest of the basic sewing stitches you can make by hand. Bring the needle up one stitch length ahead, then push it back down at the end of the previous stitch. This fills the gap, creating a continuous line that mimics machine stitching. Use it for permanent seams and attaching buttons.
If gaps appear between backstitches, the needle is not re-entering at the exact end of the last stitch. Aim for the hole, not near it.
The basting stitch is a long-running stitch (1/2 inch spacing) that holds fabric temporarily before permanent stitching. It pulls out easily. Think of it as a thread-based pin.
Which Hand Stitch Creates an Invisible Seam?
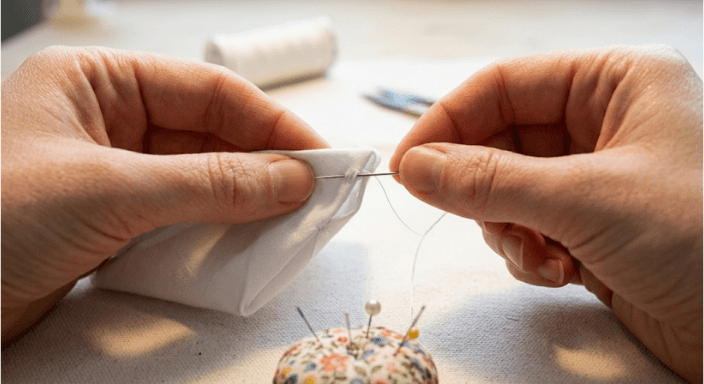
The slip stitch (also called a ladder stitch) closes openings and hems invisibly by hiding the thread inside folded fabric edges.
To work a slip stitch, fold both raw edges inward. Bring your needle up through one folded edge, cross to the opposite fold, and take a tiny bite (about 1/8 inch) along the inside of that fold. Cross back and repeat. When you pull the thread snug, the stitches disappear into the fold line.
Use it to close pillow openings, finish hand-sewn hems, or attach a lining. A hand-sewn slip stitch hem flexes with the fabric, while a machine-stitched hem creates a visible ridge on lightweight material. Among basic sewing stitches, this one earns its place as essential.
If your slip stitches show, you are picking up too much fabric per bite. Take smaller bites and pull the thread firmly (not forcefully) after every three or four stitches.
Once you can close a seam invisibly, the next skill to build is finishing raw edges and hems so they hold up over time.
What Stitches Do You Need for Hemming and Edge Finishing?
The whip stitch prevents raw edges from fraying, the blanket stitch finishes decorative edges, and the catch stitch secures stretchy or thick hems without pulling.
The whip stitch wraps diagonally over a raw edge. Bring the needle from back to front, angling each stitch over the edge at consistent spacing. It is fast, functional, and the go-to edge finish when you do not have a serger.
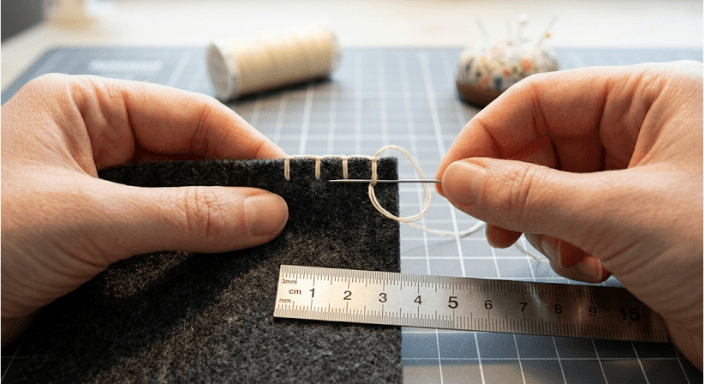
The blanket stitch creates a looped border along any edge. Insert your needle from front to back, catch the working thread under the needle point before pulling through, and repeat at even intervals. It is both decorative and structural. You will see it on felt projects, applique edges, and fleece blankets.
If your blanket stitch loops look uneven, mark stitch intervals lightly with a pencil before stitching.
The catch stitch (also called a herringbone stitch) creates a zigzag pattern that allows stretch. Work from left to right, alternating small stitches between the hem edge and the garment fabric. This is the correct stitch for hemming knits and heavy fabrics because it flexes with movement.
These three finishing stitches round out your set of basic sewing stitches. For more on matching stitches to fabrics, see the Fabric Types Guide. For a deeper hand stitching technique, see the 7 Basic Hand Stitches reference on Threads Magazine.


This article contains affiliate product recommendations. All products are flagged pre-live pending hands-on editorial testing. Sewing.com earns from qualifying purchases.
What Supplies Do You Need for Hand Sewing?
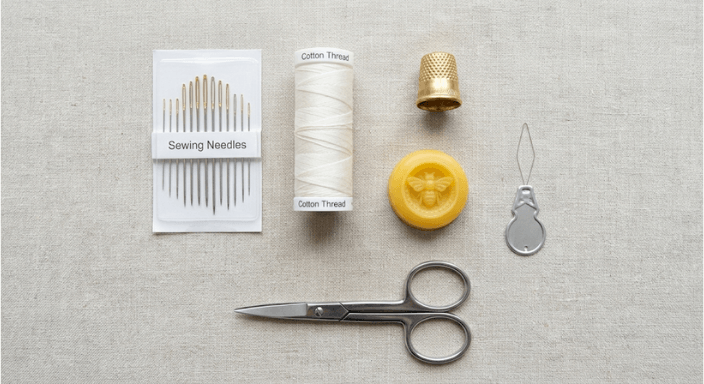
You need four things to start hand sewing: hand sewing needles (a variety pack), all-purpose polyester thread, fabric scissors, and a needle threader.
A variety pack of sharps needles covers most projects. Size 7 or 8 works for general sewing on woven fabrics. Switch to a ballpoint needle for knits to avoid snagging fibers. A needle threader eliminates threading frustration for under a dollar.
For thread, all-purpose polyester handles most fabrics. Match thread color to your fabric, or go one shade darker. Cut thread no longer than 18 inches (about elbow to fingertip) to prevent tangling.
A thimble, beeswax, and a seam ripper round out the kit. Everything you need to practice basic sewing stitches costs under $15. See 18 Must-Have Sewing Supplies for a full breakdown.
All product recommendations flagged pre-live pending hands-on editorial testing. No product is confirmed until that review occurs.
How Should Beginners Practice Basic Sewing Stitches?
Start with one stitch. Sew it on something real. Add the next stitch when you need it, not before.
The fastest path to confidence with basic sewing stitches is this: learn the running stitch today. Tomorrow, try the backstitch on something you actually want to keep. When you need to close a pillow or hem a skirt, come back for the slip stitch or catch stitch. This guide is a reference, not a curriculum. Bookmark it and return when you are ready for the next one.
A common refrain among beginners, as one poster wrote on Reddit, r/sewing: “Maybe I’m just not talented.” Uneven stitches are a practice problem, not a talent problem. Every sewist producing clean stitches today started with wobbly ones.
Download the free Basic Sewing Stitches Practice Guide (PDF) for step-by-step diagrams and one 5-minute exercise per stitch. Each exercise ties to a real outcome: sewing on a button, closing a seam, finishing a raw edge.
Download these👇
When you are ready to apply these stitches, 16 Best Sewing Projects for Every Skill Level matches projects to skills. For advanced applications, see the Threads Magazine hand and machine stitch collection.
Check this video from Jady Kreativ – 8 STITCHES You Need To Know | Hand Sewing Tutorial For Beginners.
Frequently Asked Questions
-
What is the easiest basic sewing stitch to learn first?
The running stitch is the easiest to learn. Push your needle in and out of the fabric in a straight line, keeping stitches and spaces even. It works for simple seams, gathering, and basting. Most beginners can produce a usable running stitch within five minutes of picking up a needle and thread.
-
What fabric is best for practicing hand-sewing stitches?
Use medium-weight woven cotton such as quilting cotton or muslin. It holds stitches well, does not stretch, and shows your stitch line clearly. Avoid knits and slippery fabrics until you feel comfortable with even stitch spacing. Cotton is inexpensive and widely available at any fabric store.
-
How do you keep hand sewing thread from tangling and knotting?
Cut your thread no longer than 18 inches, roughly the length from your hand to your elbow. Longer threads tangle more. Run the thread across beeswax before stitching to reduce friction and knotting. Sew with a single strand unless extra strength is needed, and pull the thread through gently rather than yanking.
-
Can you use basic hand stitches to repair clothing?
Yes. The backstitch repairs split seams, the slip stitch closes holes invisibly, and the whip stitch reattaches hems. A basic hand sewing kit and these three stitches handle most common clothing repairs without a sewing machine. Keep a small repair kit with thread, needles, and scissors for quick fixes.
-
Which hand stitch should you use to hem pants or a skirt?
For an invisible hem, use the slip stitch or blind hem stitch. Both hide the thread inside the fabric fold so stitches do not show on the outside. For thicker fabrics or knits that need stretch, use the catch stitch instead. It creates a flexible zigzag pattern that moves with the fabric.
-
Do you need a special needle for hand sewing?
A general-purpose sharps needle in size 7 or 8 works for most hand sewing on woven fabrics. Use a ballpoint needle for knit fabrics to avoid snagging the fibers. Thicker fabrics like denim require a larger, sturdier needle. A variety pack is the most practical first purchase for beginners learning basic sewing stitches.
-
How do you finish and secure your thread so stitches do not unravel?
Make two or three small backstitches in the same spot at the end of your seam. This creates a knot on the fabric surface that locks the thread in place. Alternatively, loop the thread under your last stitch and pull through to form a knot. Trim the excess thread close to the fabric.
Why did you vote that way? Drop your take in the comments.


