

Quick Answer
The visible mending movement is a slow-fashion practice where clothing repairs (holes, tears, and worn patches) are made intentionally visible using decorative stitches. By using Japanese techniques like sashiko and boro, sewists turn damaged garments into design features, signaling a commitment to sustainability, craftsmanship, and the “buy once, repair forever” philosophy.
Related: Visible Mending: Save Your Favorite Clothes With Creative Stitch Repairs
A few years ago, a hole in your jeans meant the jeans were over. Now it might be the start of something. Across TikTok, Instagram, and slow-fashion blogs, sewists are pulling out worn garments and stitching the damage into a design feature instead of hiding it.
If you can already hand-stitch a button or a running stitch, you have the skills to start. What you might not have yet is the doctrine: which technique fits which garment, what tools earn their place in your basket, and how to pick a first project without ruining something you love. That’s what this guide is for.
What Is the Visible Mending Movement?
Visible mending means repairing clothes with stitches you can see, on purpose. The repair is the design. Two Japanese traditions sit at the center of the movement. Sashiko uses small, even running stitches in a grid to reinforce and decorate a patch. Boro builds layered patchwork over time, with each repair adding to the last.
The hashtag #visiblemending has crossed 56 million views on TikTok. Pinterest, Instagram, and Etsy all show similar patterns of growth. The interest is not just aesthetic. Sewists are sharing mends as a way of broadcasting how they think about their wardrobes, their values, and their time.
The thinking behind it is older than the trend. Wabi-sabi, a Japanese worldview, treats imperfection as part of beauty. A mended sleeve is not a flawed garment. It is a garment with a record.
Why Is Mending Now Considered a Status Symbol?
For most of the last century, mending was hidden. A patched coat signaled you couldn’t afford a new one, so the goal of any home mender was to make the repair invisible. Today, the same patch reads differently. It signals that you noticed the garment was worth keeping.
Three forces drove the shift. Fast-fashion fatigue gave the audience a reason to step away from disposable clothing. Cottagecore and slow-living aesthetics gave the practice an Instagram-friendly visual language. The “buy once, repair forever” philosophy gave the practice a financial logic that holds up in a year of rising prices.
The end is the point. That is the difference between visible mending and a quick patch job. The slow stitching itself is what the practice gives back, and the finished garment carries that time on its surface.
Sashiko vs. Boro vs. Darning: Which Should You Use?
| Technique | Best Fabric | Core Benefit | Best First Project |
| Sashiko | Woven (denim, canvas, cotton, linen) | Reinforces and decorates with a running-stitch grid that distributes stress and stops the hole from growing. | Knee or seat hole on a worn pair of jeans. |
| Boro | Layered woven scraps over time | Builds an evolving record of repair, each patch added on top of the last for sculptural depth. | A jacket or apron you plan to wear for years and re-mend. |
| Darning | Knit (sweaters, socks, t-shirts) | Weaves a new thread across a gap to rebuild the missing fabric without pulling or puckering. | A sock with a small heel hole. |
The decision rule: woven fabric with a hole equals sashiko plus a backing patch. Knit fabric with a hole equals darning. Multiple-layered repairs on the same garment over time equal boro. For a first attempt, choose sashiko. It is the most documented, the most forgiving, and the easiest to undo if you change course partway through.

- Reliable Material: our Sashiko kit is specifically curated to contain all essential tools required for an at-home embroidery experience; In the pack, you will find 3 pre-printed water-soluble fabric, 2 blank water-soluble fabric, 6 denim fabric, 5 Sashiko needles, 5 Sashiko thread, 5 disposable anti-slip finger covers, and 1 Sashiko thimble; These items will ensure you can start your embroidery journey right away
- Water Soluble Fabric for Crisp and Clean Finish: the included water-soluble Sashiko fabric in our Japanese embroidery kit measure 8.27 x 11.69 inches/ 21 x 29.7 cm in size; They dissolve easily in warm water leaving no residue behind, ensuring a clean and sharp finish for your embroidery projects
- Denim Fabric for a Contemporary Touch: the Sashiko embroidery kit also includes 6 pieces of denim fabric that measure 8.66 x 9.84 inches/ 22 x 25 cm; This is fit for those enthusiasts who seeks a modern to their traditional Sashiko designs
- Convenient User-friendly Design: our water-soluble embroidery stickers are self-adhesive; Just cut out your desired pattern and stick it on the fabric before starting your embroidery; Once done, simply soak the material in warm water to dissolve the paper and unveil delicate and beautiful patterns
- Embroidery Starter Set for All: whether you're start to Sashiko or a seasoned veteran, this pack has been designed to cater to all skill levels; It offers a creative, relaxing, and rewarding pastime that can be enjoyed instantly as soon as it arrives
How Do You Choose Your First Mend Without Ruining Something You Love?
Every first-time mender breaks the same rule. They reach for the favorite garment first, the one they cannot bear to lose. Then they panic halfway through.
One mending educator on Wren Bird Arts is direct about it: “Choose a sock that you have zero emotional connection with, because your 1st darn is almost certainly not going to look good.” Field reality says start with something you wear hard but wouldn’t grieve.
The criteria are simple. Pick a garment you wear at least once a week, with a low sentimental score, in a fabric that is easy to work with. Denim or thick cotton beats silk or fine wool every time. The point of the first mend is not the finished result. It is the practice of finishing. A creator on TikTok captured exactly the trap to avoid: “I had a go at visible mending this poor ol cardigan, it was soooo difficult for me. I definitely shouldn’t have tackled the worst hole first.”-TikTok, #visiblemending
Visible mending works on everybody and every garment cut. Knees, elbows, and inner thighs wear out the same way regardless of size. If you’ve avoided the practice because you weren’t sure it scaled to your wardrobe, it does.
What Tools Are Required for a Beginner Mending Kit?
You can start with what you have. Building a real mending kit happens over your second and third mend, not your first.
- Level 1 (free or under $5): A regular sewing needle, embroidery floss you already own, and a scrap of fabric for the backing patch. This is enough for one experimental mend.
- Level 2 ($15 to $30): A sashiko needle (longer and sharper than a standard sewing needle), a skein of sashiko thread, and a small block of beeswax. A practitioner at Wren Bird Arts explains the beeswax: “I started using beeswax in my denim mending practice. It also helps to keep the thread from tangling up.”
- Level 3 ($30 to $60): An embroidery hoop for stability, a mending loom or speedweve for sweater holes, a heat-erase fabric marker, and a small stash of patch fabric in different weights.
Tool investment earns its place. Buy Level 2 after you finish your first mend and know you are going to do another.
- This beeswax is an alternative thread surfacing material
- Use it to prevent fraying and tangling while you're working on your projects!
- Just draw the thread through the convenient slits in the case
- This package contains one pack of beeswax
- For your beading projects
Disclosure: This page contains affiliate links. We may earn a commission on purchases made through these links, at no extra cost to you. We only recommend tools we have tested in our own mending practice.
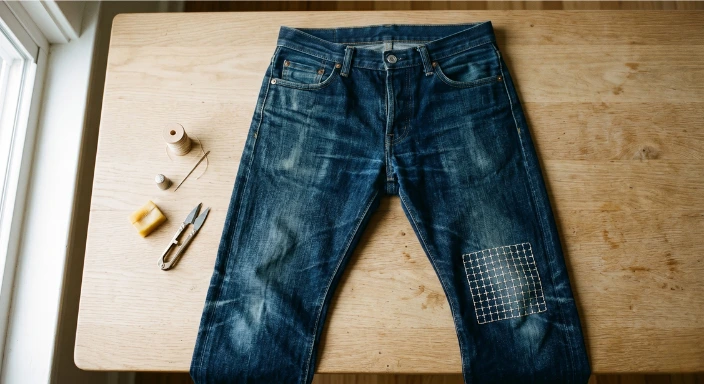
How Do You Sashiko-Mend Jeans? (5-Step Guide)
This is the foundation technique. Once you have it, sashiko works on tote bags, jackets, work shirts, and any sturdy woven fabric.
-
Prep the garment.
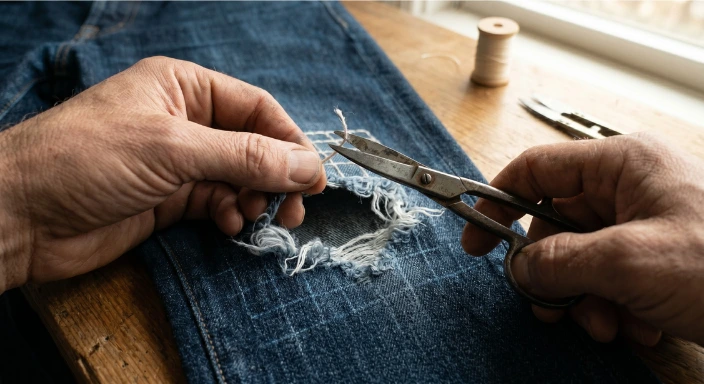
Lay the jeans flat on a clean surface. Trim any frayed threads around the hole with small scissors, keeping every cut shallow. Do not cut into solid fabric. Only loose threads come off.
-
Cut a backing patch.

Choose a patch fabric (denim scrap or thick cotton works) at least 2 cm larger than the hole on every side. Pin it to the inside of the jeans, behind the hole
-
Mark a grid.

Use a heat-erase fabric pen and a small ruler. Draw a 1 cm grid centered over the hole, extending at least 2 cm past the hole on every side. Your stitches will follow these lines.
-
Stitch the rows.

Cut a length of sashiko thread no longer than the distance from your elbow to your fingertips, roughly 30 to 35 cm. Run it through beeswax. Not the end. Working from the inside out, sew running stitches along each grid line. Stitches should be about 5 mm long with 2 mm gaps.
-
Knot off and erase.
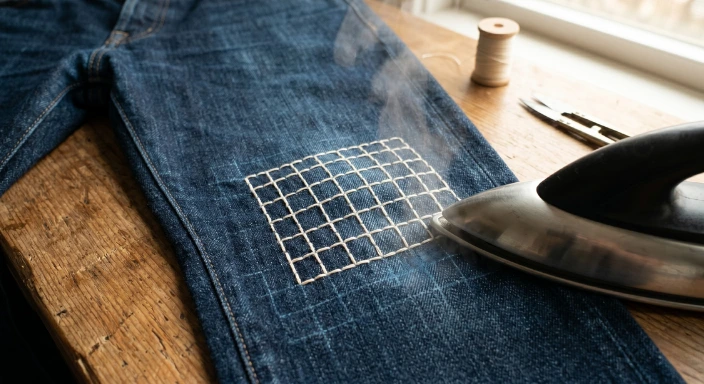
Knot the thread on the inside, trim the tail, and run a warm iron over the grid lines to erase the marker. Press the patch flat from the inside.
What Mistakes Do First-Time Visible Menders Make?
Three failures show up in nearly every mending forum and creator comment thread.
- Tackling the favorite first. Fix: pick the garment you would accept as a write-off. The first step is practice. The second is when the favorite earns its turn.
- Long thread, tangled mess. A practitioner on OurHands names the trap exactly: “long threads can be a nightmare to work with. They’re more prone to tangling, can easily get caught in the fabric, and may scrunch up the material as you tighten your stitches.” Fix: 30 to 35 cm lengths, run through beeswax before threading the needle.
- Decorating before reinforcing. A pretty stitch on an unstabilized hole tears within five wears. Fix: The backing patch always goes in before the decorative grid. Structure first, beauty second.

- 【Wooden Darning Mini Loom】14 hooks darning loom equipped with a small 2.55-inch round flat plate, and smooth edges to ensure the flatness of the weave. Apply to mending socks, jeans, sweaters, handkerchiefs, scarves and other clothing
- 【Darning Mushroom Egg】Smooth curved handheld darning mushroom egg targeted to repair socks, sleeves and other bulging clothing. The removable device is easy to assemble. Creative design is convenient to quickly locate the location you need to repair
- 【Cute and Practical Weaving Comb】Cat-shaped plastic weaving comb with a comfortable grip. Assist you in effectively adjusting the embroidery thread spacing, to ensure that the embroidery thread is tight and orderly. With 50 different colors of mending thread, soft and persistent. Suitable for a variety of crafts to create personalized patterns
- 【Complete Supporting Accessories】Detailed instructions are attached at the bottom of the box to help you easily master sewing skills. The necessary accessories for sewing are fully provided. Including individually packaged 10 knitting needles, 10 markers, a loom pick tool and rubber bands, which ensure your sewing project proceeds smoothly without looking for additional accessories
- 【Ideal Gift for Weaving Lovers】 The knitting action can improve hand-eye coordination and concentration, it is a good choice as a gift for friends, family and knitting lovers, they will be amazed by this cute little tool
Why Visible Mending Sticks
The practice is not really about technique mastery. It is about a different relationship with what you already own. A mender working at TOAST shared a story about repairing a cardigan with 136 moth holes: “The lady who gave it to me didn’t care how much it cost her or how long it took, for her it was irreplaceable.”
Mend before you make. The garment you have been avoiding because you weren’t sure how to fix it is the right place to start.
Your First Mend Starts Here
Download our free Visible Mending First-Mend Field Card, a single-page printable with the garment-selection criteria, the three-tier tool checklist, the 5-step sashiko-on-denim flow, and the three first-time mistakes to avoid. Tuck it into your mending basket and refer back as you go.
Then pick the garment you have been avoiding. Mend it this weekend.
Simple and easy Sashiko visible mending for beginners – from tools and materials to stitching from The Green Wrapper
Frequently Asked Questions
-
What is visible mending?
Visible mending is the practice of repairing clothes with intentionally visible stitches as a design choice. Sashiko, boro, and decorative darning are the most common techniques. The mend becomes part of the garment’s story rather than a flaw to disguise. It celebrates wear and extends the life of garments.
-
Do I need a special thread for sashiko mending?
Sashiko thread is recommended but not required for your first mend. It is a single twisted strand that does not divide, making it strong and consistent. Embroidery floss works as a substitute if you use all six strands together. Run your thread through beeswax to reduce tangling on denim.
-
How long should my thread be for visible mending?
Cut thread no longer than the distance from your elbow to your fingertips, roughly 30 to 40 centimeters. Longer threads tangle, fray, and bunch the fabric as you stitch. If you need more length partway through a row, knot off on the inside, re-thread, and continue. Short threads finish cleaner.
-
Can you visibly mend stretchy fabrics like sweaters and t-shirts?
Yes, but use darning rather than sashiko. Darning weaves thread across a gap, while sashiko’s rigid running stitches can cause knits to pucker and distort during wear. For a sweater hole, weave thread across the gap using a darning needle and a darning egg or mending loom.
-
What size patch should I cut for a hole in jeans?
Cut your backing patch at least 2 centimeters larger than the hole on every side. The fabric around a worn hole is already weakened, and a small patch leaves you with the same problem in three months. A generous patch anchors your stitches into solid fabric and prevents the hole from spreading.
-
Is visible mending only for sustainability reasons?
No. Many menders start for sustainability and stay for the meditative quality of slow stitching. Others come for the aesthetic. Visible mending is increasingly seen as a signal of craftsmanship in fashion, not a thrift solution. The reasons stack: a mended garment is sustainable, personal, and visually distinct, all at once.
-
How long should my first sashiko mend take?
Plan for two to three hours of focused stitching for a single jeans-knee hole. The actual stitching is roughly 30 to 45 minutes. The rest is preparation, grid marking, threading, and re-threading as you go. First mends always run longer than expected, and that is part of the practice. Speed is not the goal.
Is this an ‘easy weekend win’ or a ‘labor of love’? Share your reasoning!👇


