• Home
  • Sewing
    • Patterns
    • Materials
    • Organization
    • Supplies
  • Fashion Sewing
    • Dresses
    • Jackets & Coats
    • Pants & Shorts
    • Tops & Blouses
    • Accessories
  • Home Decor Sewing
    • Curtains
    • Pillows
    • Bedding
    • Novelty
    • Holiday Sewing Projects
  • Hand Sewing
    • Hand Embroidery
    • Crochet
    • Knitting
  • Sewing Techniques
    • Wovens
    • Knits
    • Quilting
    • Sewing Tips & Tricks
    • Specialty Fabrics
    • Sewing Skills
Logo
  • Patterns
  • Materials
  • Organization
  • Supplies
You are here: Home / organizer / Sew Your Own DIY Cosmetics Bag This Christmas | Holiday Sewing Projects

Sew Your Own DIY Cosmetics Bag This Christmas | Holiday Sewing Projects

October 21, 2022 By Sewing.com 4 Comments

If you ever find yourself scavenging through your drawers looking for a cosmetics bag you can bring with you, this might just end your search. Today, we’re going to learn how to do a DIY cosmetics bag that won’t even take you the entire afternoon to whip up!

DIY Cosmetics Bag | 7 Easy Steps to Make Your Own

There’s no doubt that a cosmetics bag is a must-have for every lady. We all need it for storing our makeup, lipsticks, brushes, and whatever makeup product you may have. It doesn’t just make it easier for us to find everything in one place, it helps us become more organized too. I can’t recall how much I’ve spent on buying cosmetics bags in the past, but one thing is for sure — I’ve saved a lot since I started making my own. So if you’re ready to start, dust off that sewing machine, prepare your materials, and let’s get started!


What You’ll Need:

Textiles:

  • 2 10″X14″ canvas fabric
  • 1 10″X14″ fusible interfacing
  • floral print fabric
  • 9″ Zipper

Tools:

  • a pair of scissors
  • fabric marker
  • iron
  • ironing board
  • ruler


Let’s get started!

Step 1: Mark and cut the fabric

Sew Your Own DIY Cosmetics Bag This Christmas | Holiday Sewing Projects
The first step is to mark the canvas fabric and the floral-print fabric. I suggest you mark them individually for accuracy. The dimensions are:

  • Length: 6″
  • Width: 4″
  • Height: 3″

After marking, you can go ahead and start cutting. I’d also suggest that you cut each fabric individually. Please make sure to use a sharp pair of fabric scissors to ensure a clean and precise cut.

Step 2: Apply fusible interfacing

If you feel the fabric you’re using lacks thickness, you can fuse interfacing to the fabric to give it more body and to retain the structure. To do this, iron the fusible interfacing on the wrong side of the floral-print fabric, cut the excess, and iron again. If this is your first time to use fusible interfacing, it is wise to follow the instructions attached to the packaging.

Step 3: Stitch the edges of the fabric

Sew Your Own DIY Cosmetics Bag This Christmas | Holiday Sewing Projects
Although this step is optional, I still prefer taking the extra step. I don’t want the ends of the fabric to fray, especially when I use my cosmetics bag every day. So to prevent fraying, you will need to overlock stitch all of the fabric edges.

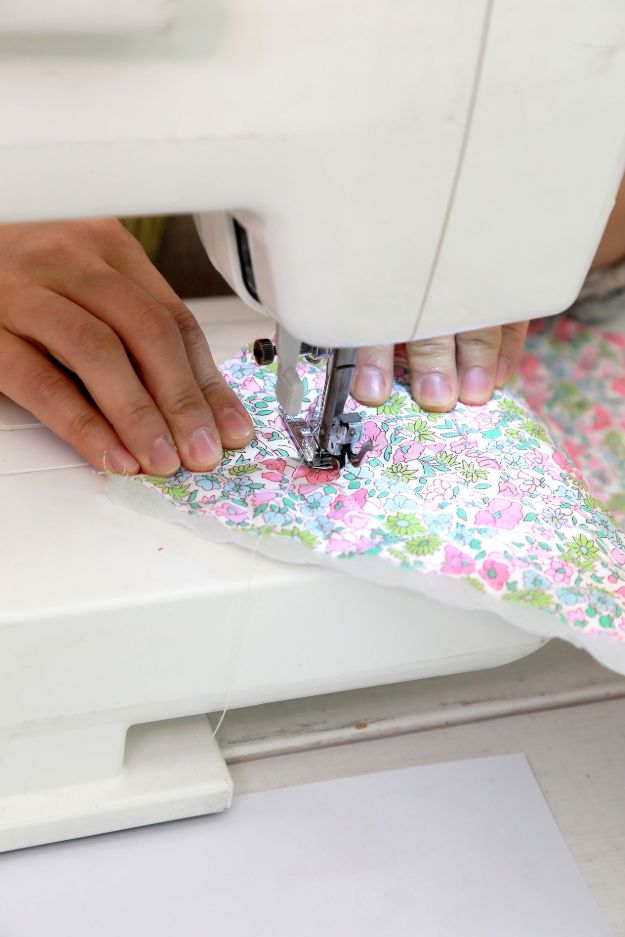
Step 4: Sew the zipper

Sew Your Own DIY Cosmetics Bag This Christmas | Holiday Sewing Projects
Lay the canvas fabric and floral-print fabric together. Make sure the good side of the floral-print fabric is on top. Meanwhile, position the zipper facing downwards on the fabric. Using a zipper foot attachment, go ahead and sew your zipper on. Next, you need to iron and press the seam open and top stitch along the zipper. Repeat the steps on the other side of the fabric.

Step 5:  Sew both ends

We’re almost there! Now, it’s time to close the bag up. Turn the fabric inside out and position the zipper in the center of the bag. Run it through the sewing machine again, but this time, sew to close both ends.

Step 6. Give the bag some depth

Adding depth to your cosmetics bag will bring out its fullness, so it won’t stay flat. To give the bag some depth, measure 1.5 inches from the corners of the bag. Sew the lines you marked and then cut the excess fabric.

Step 7. Turn the bag inside out

When the sewing is complete, turn it inside out and see if all sides are even and symmetrical. If you’re not satisfied with the shape, you can go back to the previous step and make the necessary adjustments needed.


I don’t know about you, but I don’t think I’ll spend on cosmetics bags anymore after I learned how to make one. This project is awesome! And what I love even more about it is that the possibilities are endless! There are so many beautiful fabrics out there, I doubt if you can even keep up! But hey, the availability of the materials and the range of fabrics and accessories to choose from definitely makes this one of the best Christmas gift ideas for our girlfriends!

If you were to make your own DIY cosmetics bag now, how would you design it? Let me know by leaving your comment below!

Up Next: 17 Impeccable Hand Embroidery Designs | Sewing Tips, Ideas, And Guide

Filed Under: organizer, Sewing Tutorial

Comments

  1. Leigh Neff says

    November 24, 2016 at 10:14 PM

    Great tutorial! Would you mind telling me what fusible interfacing you used?

    Reply
    • Courtney says

      November 30, 2016 at 12:21 PM

      Hi Leigh! We prefer medium weight iron-on fusible interfacing. You can purchase it at the link below. 🙂

      https://www.amazon.com/Thermoweb-Medium-Weight-Fusible-Interfacing-White/dp/B001C205PA/ref=as_li_ss_tl?s=arts-crafts&ie=UTF8&qid=1480528194&sr=1-2&keywords=fusible+interfacing&linkCode=ll1&tag=prodinsert-20&linkId=0cb1916c4ebd8a5b43ba5271a69572d4

      Reply
  2. Hershey's Choco says

    August 21, 2017 at 12:59 PM

    Hi. U mentioned to cut 2pieces of canvas. But from the tutorial, I didn’t see e 2nd pic of canvas material being used. Pls correct me if I’m wrong.
    As for the flower print fabric, I should cut as per dimension given? 6″x4″x3″?
    If it’s so, why is that when u serge e fabric, I saw that both the canvas and flowers print material are of e same measurements..?

    Reply
  3. Debbie says

    January 10, 2020 at 7:14 PM

    There seems to be quite a bit of the article missing. There is no photo of the finished project. I followed a link for a bag to organize sewing supplies. What is going on?

    Reply

Leave a Reply Cancel reply

Your email address will not be published. Required fields are marked *

  • Facebook
  • Instagram
  • Pinterest
  • Twitter

SUBSCRIBE TO SEWING.com AND GET THIS FREE GIFT!

Sewing-Basics-for-Family-and-Home

10 DIY Roman Shades – Sewing Tutorials And Ideas

DIY Roman shades are practical …Continue Reading

17 Quick and Easy Thanksgiving Sewing Project You Can Do This Fall

Fill your home with the colors and …Continue Reading

10 DIY Plus Size Halloween Costumes You Can Sew

Go out of the box by creating the …Continue Reading

Go Shopping

  • Joann’s
  • Fabric.com
  • Michael’s
  • Art.com
  • Bed Bath & Beyond

Other Great Sites

  • DIY Projects
  • Homesteading
  • Garden Season
  • Homemade Recipes
  • Makeup Tutorials

Resources

  • FREE Sewing Patterns
  • Sewing Terms Dictionary
  • Sewing Projects
  • Sewing Machines
  • Sewing For Beginners
  • About Us
  • Advertise With Us
  • Privacy Policy
  • Contribute
  • Contact Us
  • Terms of Service
Sewing.com
Email Support: [email protected]
Phone: 512-394-8187

Product returns go to:
1889 E Maule Ave, Ste G
Las Vegas 89119

Copyright © 2023 · Sewing.com


This copyrighted material may not be republished without express permission. The information presented here is for general educational purposes only.

MATERIAL CONNECTION DISCLOSURE: You should assume that this website has an affiliate relationship and/or another material connection to the persons or businesses mentioned in or linked to from this page and may receive commissions from purchases you make on subsequent web sites. You should not rely solely on information contained in this email to evaluate the product or service being endorsed. Always exercise due diligence before purchasing any product or service. This website contains advertisements.

We use cookies to personalize content and ads, to provide social media features and to analyze our traffic. You consent to our cookies if you continue to use our website.

Privacy settings

Privacy Settings

This site uses functional cookies and external scripts to improve your experience. Which cookies and scripts are used and how they impact your visit is specified on the left. You may change your settings at any time. Your choices will not impact your visit.

NOTE: These settings will only apply to the browser and device you are currently using.

This website uses cookies

We use cookies to personalize content and ads, to provide social media features and to analyze our traffic. You consent to our cookies if you continue to use our website.

Powered by Cookie Information