
Have you ever tried sewing scalloped edges to your fabric pieces? Level up your sewing skills in styling projects like aprons and sheets by reading this tutorial today!
Scalloped edges add a fancy and feminine detail to any sewing project. Whether it’s a skirt or a tablecloth, your basic fabric will have an extra appeal after adding these cute patterns. It may look complicated, especially if you’re a beginner, but let me share the easiest skill I learned to sew perfect scalloped edges every time.
TL;DR: How to Sew Scalloped Edges
- It outlines the process of creating scalloped edges, starting with planning (measuring, deciding scallop size, making a template) to ensure full, clean scallops along an edge.
- It highlights both template-based and machine stitch methods: you can trace curves from a paper template, sew around them slowly, then trim and press for crisp scallops.
- It emphasises key finishing steps: clipping at the valleys of each scallop without cutting the stitching, trimming seam allowances close, and pressing through each curve to set the shape.
- It notes fabric and stitch considerations: use fabrics that hold curved edges well (tightly woven natural fibres), and choose a short stitch length to sew around curves cleanly.
- It encourages practice and patience: scalloping isn’t complicated, but doing it precisely takes time, accurate markings, slow stitching, and careful trimming make the difference.
Learn How To Sew Scalloped Edges To Spruce Up Your Sewing Projects
It’s easy to sew scalloped edges on the hem or faced edges. It adds balance to your fabric or garments. For your little girls, adding scalloped edges to their garments makes it visually pleasant and adorable.
If you’re wondering how to create this design, you have two options. First, you can create your own scallop pattern by drawing an arch on paper, tracing the curved edge of a dinner plate or bowl. Your second option is to use a purchased scallop marking tool. Either of the two options can give you the scallop patterns of your desired size.
For this project, you’ll need:
- fabric
- marking tool (fabric marker or tailor’s chalk)
- pins
- scallop template
- scissors
- sewing machine
- flat iron
Let the sewing begin!
Instructions:
Step 1: Find the center of the fabric
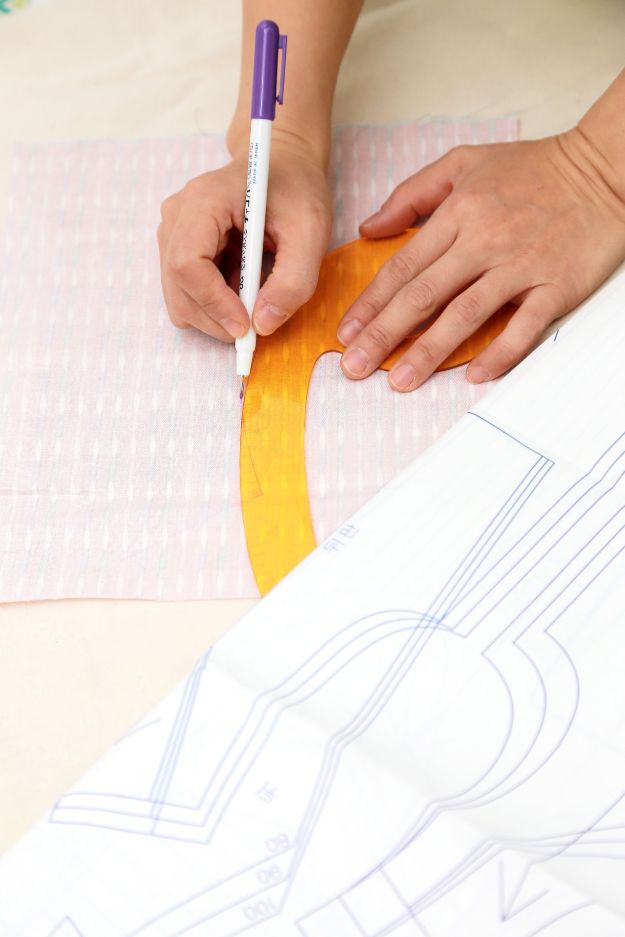
On the fabric’s wrong side, mark the edges of the fabric at the center using a fabric marking tool.
Step 2: Trace the scallops
Center the scallop template 1/2 inch from the edge of the fabric at the marked point. Trace around the scallop edge of the template. Pick up and reposition the template as necessary and continue marking scallops along the entire length of the fabric.
Step 3: Stitch on the lines
Pin the marked fabric and the lining or face the fabrics’ right sides together — matching the right edge along the scallop edge. Stitch on the marked scallop line. Make sure you remove the pins as you go.
Step 4: Trim and snip
Trim the fabric approximately 1/8 inch from the edge of the stitching. Snip the valley of each scallop without cutting into the stitch. If the scallops are deep, creating a sharply curved edge, notch the seam allowances along the curves so the fabric will lie flat when turned inside out.

Step 5: Press the fabric
Turn the fabric right side out, then roll the seams between your fingers to help the seam lie flat. Press the scallop edge. And we’re done with our pretty scalloped edges!
Watch the full tutorial of this technique from LandauerPublishing:
Easy yet classy! I hope you’re able to make this design too! I think this simple design was able to channel out the woman within us, right? Not to mention the creativity in tracing scallop patterns. Cheers to another skill added to your sewing skill vault! ‘Til next time!
Interested to learn more easy sewing techniques? Click here.
Like this? You’ll also like…
15 Quick and Easy Sewing Patterns You Can Sew This Weekend!Sewing 101: How to Sew a Zigzag Stitch24 Beautiful DIY Fabric Crafts