
If you’ve got fat quarters piling up, it’s time to put them to work. They’re perfect for quick projects like tote bags, fabric baskets or simple gifts. Fat quarters are also pre-cut, which means they save time and reduce fabric waste. Whether you’re a beginner or an experienced sewist, these fabric pieces are fun to work with. Let’s look at three easy projects you can make with them.
🧵 What Is a Fat Quarter?
A fat quarter is a fabric cut that measures 18 x 22 inches. Unlike the traditional quarter-yard (9 x 44 inches), a fat quarter is wider and almost square. This makes it ideal for projects needing more width, such as bags or baskets. You can find fat quarters individually or in bundles that come in coordinated colors or prints.
👜 1. Quick and Easy Zipper Pouches
Zipper pouches keep small items neat and easy to find. They’re great for makeup, sewing tools or craft supplies. Choose bold prints, pair them with solid fabrics and add a colorful zipper or pull tab for extra convenience. Best of all, you can adjust the size to create anything from a coin purse to a craft organizer.
Materials:
- 1 fat quarter for the outer fabric
- 1 fat quarter for the lining
- A 7–9-inch zipper
- Fusible interfacing for structure
Steps:
- Cut two 8 x 6 inch rectangles from both the outer fabric and the lining, for a total of four pieces.
- Apply fusible interfacing to the wrong side of the outer fabric using an iron.
- Place one outer fabric piece right side up. Position the zipper face down along the top edge. Then, layer one lining piece on top, right side down, to make a fabric-zipper sandwich.
- Pin the layers to prevent shifting, then sew along the zipper using a zipper foot for a neat seam.
- Flip the fabrics to expose the zipper, then press the fabric flat. Repeat steps 3–4 for the remaining outer and lining pieces on the other side of the zipper.
- Open the zipper halfway to make turning the pouch easier later.
- Align the outer fabrics right sides together and do the same with the linings. Pin around the edges and match seams at the zipper.
- Sew around the entire pouch and leave a 3-inch gap at the bottom of the lining.
- Trim the corners diagonally to reduce bulk without cutting through the stitches.
- Turn the pouch right side out through the gap and use a blunt tool to push out the corners.
- Sew the lining’s opening closed with a slip stitch or topstitch.
- Finally, press the pouch flat to give it a polished look.
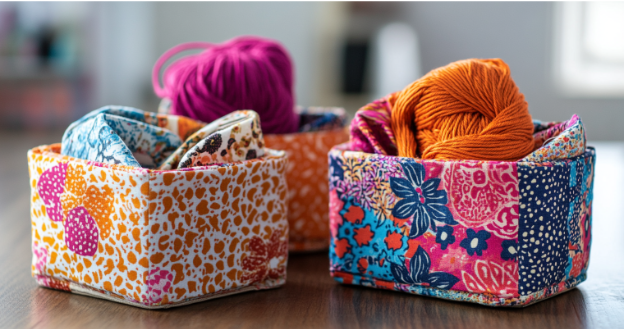
🧺 2. Reversible Fabric Baskets
Reversible fabric baskets are basically two baskets in one—flip them inside out, and boom, new look! They’re great for holding craft supplies, toys, or even that random stuff you can’t find a place for. They’re sturdy enough to stand tall but soft enough to fold flat when you’re done. Organizing? It’s suddenly way more fun.
Materials:
- 2 coordinating fat quarters
- Fusible fleece for structure
Steps:
- Cut two 10 x 10-inch squares from each fat quarter and two 10 x 10-inch squares of fusible fleece.
- Iron the fusible fleece to the wrong side of the outer fabric. This will add structure so the basket can stand upright.
- Place the outer fabric squares right sides together and pin. Sew around the sides and bottom with a ½-inch seam allowance. Leave the top open.
- Repeat step 3 with the lining fabric, but leave a 3-inch opening at the bottom.
- To box the corners, pinch one bottom corner of the fabric. Align the side seam with the bottom seam to create a triangle. Measure 2 inches from the point, draw a line and sew across. Trim the excess fabric and leave a ¼-inch seam allowance. Repeat for all corners.
- Insert the lining into the outer basket with right sides facing. Then, align the seams and pin around the top edge.
- Sew around the top edge with a ½-inch seam allowance.
- Turn the basket right side out through the opening in the lining. Push out the corners to maintain the basket’s shape.
- Tuck in the raw edges of the lining opening and stitch it closed.
- Finally, push the lining down into the basket and press the top edge flat. Finish with a topstitch around the edge for a clean, professional look.
🍳 3. Fat Quarter Aprons
Fat quarter aprons are perfect for keeping your clothes clean while you cook, craft, or garden. Add a front pocket to hold small tools, recipe cards, or seed packets. You can also customize the ties: make them long enough to wrap around your waist or use ribbon for a softer look. Additionally, these aprons are easy to adjust and can fit both kids and adults comfortably.
Materials:
- 2 fat quarters (one for the front, one for the lining)
- Fabric strips or ribbon for ties
Steps:
- Lay the fat quarters on top of each other, right sides facing. Draw your apron shape onto the fabric—this can be a simple rectangle or the classic curved-at-the-bottom look.
- Cut through both layers at the same time to ensure they’re identical.
- Pin the layers together and align the edges. Then, sew around the edges with a ½-inch seam allowance and leave a 4-inch gap.
- Clip the curved edges if needed and be careful not to cut into the stitches.
- Turn the apron right side out through the gap. Afterward, use a blunt tool to push out the corners and smooth the edges.
- Press the apron flat, then topstitch around the perimeter to close the gap.
- Create waist ties by cutting long strips from leftover fabric or using sturdy ribbons. Attach them securely to the top corners of the apron with reinforced stitching.
- Add a pocket for extra functionality by cutting a small rectangle from a coordinating fat quarter. Finally, hem the top edge and sew it onto the front of the apron.
No More Fabric Leftovers
Who knew a fat quarter could do so much? A small piece of fabric can create practical, pretty and fun sewing projects. It’s all about getting creative with what you have. So don’t wait—pull out those fat quarters and get sewing!
FAQs About Sewing with Fat Quarters
Q1: Can I make clothes with fat quarters?
Yes! While you can’t make full garments, they’re perfect for small clothing items like baby bloomers, skirts, or patchwork tops.
Q2: Are fat quarters the same size everywhere?
Generally, yes—18″ x 22″ is standard. But slight variations can happen depending on the manufacturer.
Q3: Do I need special tools to sew with fat quarters?
Nope. Basic sewing tools like scissors, pins, and a sewing machine are all you need.
Q4: How many fat quarters make a quilt?
It depends on the quilt size. A baby quilt may need 6–9 fat quarters, while a lap quilt could need 12–20.
Q5: Can I make tote bags with fat quarters?
Absolutely. Two fat quarters (outer and lining) plus straps make a cute tote.
Q6: How do I keep fabric from fraying?
Finish raw edges with a zigzag stitch, pinking shears, or a serger.
Q7: What’s the best fabric type for fat quarter projects?
Quilting cotton is most common, but linen, canvas, or lightweight denim also work well.
Q8: Can I quilt with just fat quarters?
Yes! Many quilt patterns are designed specifically for fat quarters.
Q9: Do I need to iron fat quarters before sewing?
Yes, ironing helps with accuracy when cutting and sewing.
Q10: Where can I buy fat quarters?
Fabric stores, craft shops, online retailers, and even local quilting fairs.


