
Key Takeaways
Visible mending is the art of repairing garments using exposed, decorative stitches like sashiko and darning. Rather than hiding wear, this practice celebrates it. This guide covers the essential $25 supply kit, the 60-second garment audit, and a five-step tutorial so you can finish your first patch tonight.
Related: Visible Mending Movement – Sashiko Mend
This article contains affiliate links. We earn a small commission on tested products at no cost to you.
What Is Visible Mending and Why Is It Trending?
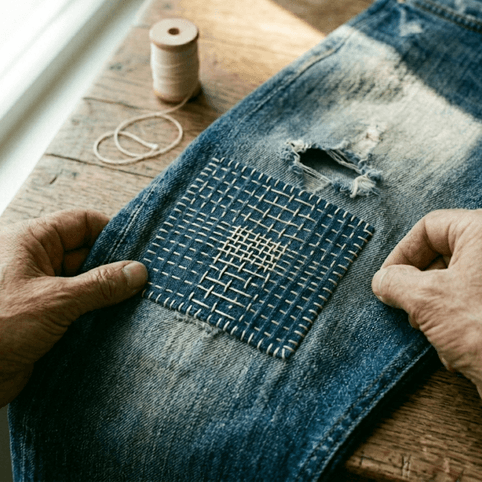
Mending and clothing repair, in the visible mending tradition, means fixing a tear, hole, or worn spot with stitching that’s meant to be seen. Contrasting thread. Decorative patches. Geometric grids of running stitches across a knee. The repair isn’t disguised. It’s part of the garment now.
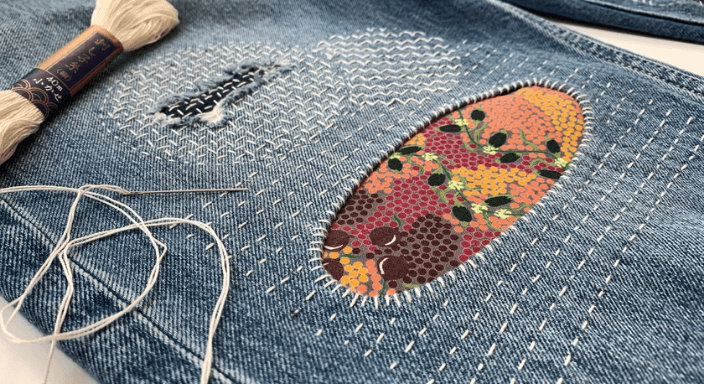
The practice draws from Japanese sashiko and boro, the centuries-old technique of stitching layers of indigo cotton to extend the life of working clothes. It also draws from the modern Visible Mending Programme, which treats repair as a primary skill domain rather than a finishing-line afterthought.
The trend is rising in 2026 for reasons that go beyond aesthetics. Economic pressure has made clothing repair financially practical again. Cultural rejection of fast fashion has created demand for repair skills. Social media communities have normalized “ugly beautiful” repair aesthetics. The Japanese sashiko technique has crossed firmly into the Western craft mainstream, often as a quiet rebellion against the disposable haul cycle.
Here’s the part most tutorials skip: your first mend is going to look uneven. Stitches won’t all be the same length. The patch will sit slightly crooked. That is the correct outcome.
“It doesn’t have to look perfect. It can be wonky and flawed and your own.”
One textile artist quoted in NPR’s coverage of visible mending put it plainly. The wonkiness is the human signature on the garment. Stitch-perfect machine precision defeats the point of mending and clothing repair as a creative practice in the first place.

- Complete Supplies for Versatile Mending: The knit patch kit contains 1 darning mushroom, 9 needles in three sizes, 1 darning comb,1 magnetic needle holder, 1 threader and 1 storage box. This sewing kit for adults provides everything needed for daily repairs, allowing you to tackle holes in socks, sweaters, scarves, and more with professional results
- All-in-One Darning & Repair Kit: This comprehensive darning kit features a high-quality wooden darning mushroom designed with a smooth, curved handle to reduce wrist pressure. It serves as the perfect darning tool and sweater hole repair kit, ideal for creating invisible knit patches on various fabrics
- Premium Materials with Box Storage: Crafted from durable, eco-friendly natural wood, the darning mushroom has a polished surface that protects fabrics. The set includes a stylish and practical storage box to neatly organize all components, making this sewing kit for adults both elegant and functional
- Stable & Easy-to-Use Design: An elastic rope secures around the mushroom's grooves, holding fabric firmly in place to prevent slipping during repairs. The compact darning tool disassembles easily, and its hollow handle can store needles safely—making every knit patch kit project convenient and efficient
- Perfect Gift for DIY Enthusiasts: An ideal present for crafters, this darning kit enables beautiful handmade repairs on clothing and accessories. Whether for friends, family, or personal use, it encourages creativity and makes mending a simple, enjoyable hobby
Should You Mend It? The 60-Second Garment Audit
Before you cut any thread, run a fast audit on the garment in your hands.
Two questions. Do you wear this thing at least once a month? Will you wear it 20 or more times after the repair? If the answer to either is no, mend something else.
This sounds harsh, but it’s the difference between a repair that earns its place in your wardrobe and a craft project that goes back into the same closet purgatory the garment came from. The skill builds either way. The wardrobe only builds when the mend lives on a garment you actually reach for.
Pinch the fabric next to the worn spot. If it tears with light pressure, the surrounding fabric is too thin to hold stitches. A beautiful sashiko grid stitched onto rotted denim is a countdown to a bigger hole. Mend garments where the damage is localized, not garments where the whole panel is breaking down.
What Supplies Do You Need for Mending & Clothing Repair?
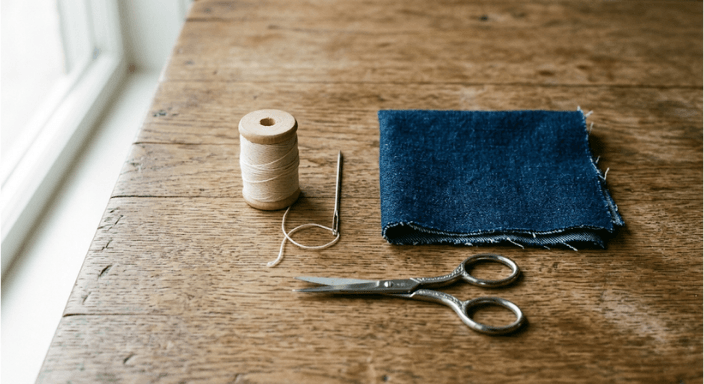
You can begin mending and clothing repair with under $25 in supplies. Honest list:
Essential:
- Sashiko thread or perle cotton size 8. Sashiko thread is matte, thick, and grips fabric layers without needing a knot for every stitch. If your local craft store doesn’t carry it, perle cotton size 8 is the closest substitute. Doubled embroidery floss works in a pinch but isn’t as durable.
- A long sashiko needle or darning needle. Long shaft, sharp tip, large eye. Standard embroidery needles are too short to load multiple stitches at once.
- Sharp embroidery scissors. For clean thread cuts. Dull scissors fray sashiko thread before you even thread the needle.
- Patch fabric. Old jeans, linen scraps, a worn-out cotton shirt. Tight-weave woven cotton or denim. Don’t use stretch fabric for woven repairs; it warps under tension.

- A must buy product
- Used for silk ribbon and yarn embroidery, typing quilts and candle wicking
- Made in japan
Optional but useful:
- Darning mushroom. A wooden dome that sits inside a sock or sweater hole to hold the fabric flat while you weave. A tennis ball works as a substitute.
- Embroidery hoop. Stabilizes the fabric. Most denim mending doesn’t need one. Sweater darning does.
Skip the prefab “visible mending starter kit” until you’ve completed one repair. You’ll know what you actually use after that, and the kits typically over-supply.
Where Should You Mend? Stress Zones vs. Decorative Zones
The traditional Visible Mending Programme says hand stitching alone is enough for any repair. Field reality on a denim crotch repair says otherwise.
The reconciliation is a stress-zone trigger:
- In low-stress zones, hand stitching only is enough. Sweater elbow. Sock heel. A knee tear that sits above the bend, not on it. Pocket flaps. Decorative tears anywhere the fabric isn’t under constant friction. Pure sashiko or darning works here. The stitches survive normal wear and washing.
- High-stress zones, machine reinforcement underneath, hand artistry on top. Denim crotch. Inner thigh seams. Pocket corners. Jacket cuff edges. Anywhere fabric rubs against fabric, every step you take.
In a high-stress zone, pin a denim or sturdy cotton patch on the inside of the garment, zigzag-stitch around the patch edge with a sewing machine, and then layer your visible sashiko stitching on top from the outside. Two layers of doctrine, in sequence. The machine patch holds the structure. The hand stitching does the visible work.
Pure hand-mending on a denim crotch will fail within five wears. That’s a tool selection problem, not a skill problem.
How Do You Sew a First Sashiko Patch on Jeans? (Step-by-Step)
Skill prerequisite: You can thread a needle and execute a running stitch. That’s the whole technical foundation. If you’ve ever sewn on a button or stitched a basic seam by hand, you’re ready.
Curve-inclusive note: When mending denim across a curve (knee, thigh, hip) pin the patch with the leg in its worn position, not flattened against itself. Otherwise, the patch puckers when the leg bends and the stitches strain on the curved side.
-
Step 1. Cut Your Patch
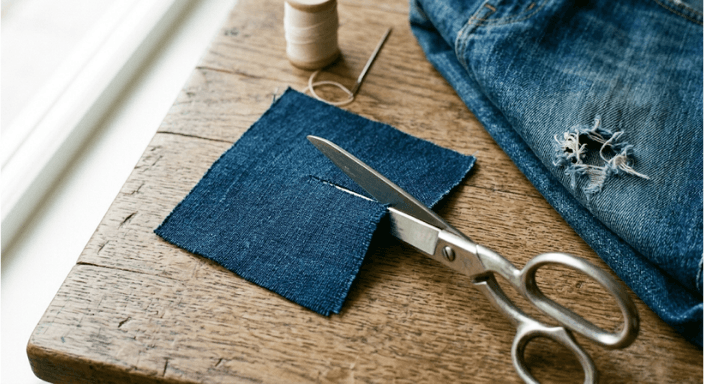
Cut a denim or linen patch ½ inch larger than the hole on every side. A square or rectangular shape works for a first project. Freeform shapes are a level-two skill. Trim any loose threads from the worn edge of the hole so you’re working with a clean edge.
-
Step 2. Pin the Patch to the Inside
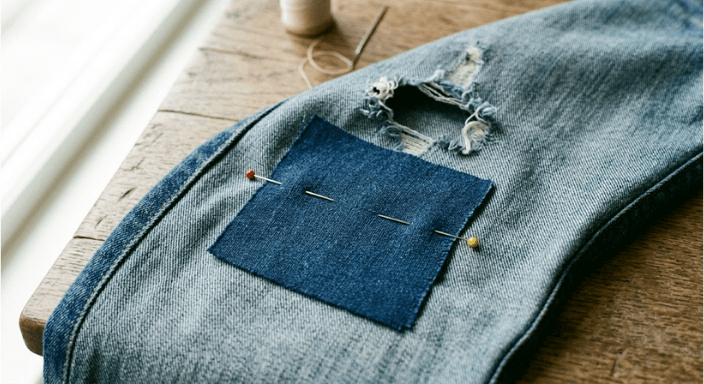
Turn the jeans inside out. Position the patch under the hole on the inside of the leg, centered. Pin from the outside through both layers, with the pins lying flat along the patch edges. Make sure you’re not pinning the back of the leg to the front.
-
Step 3. Thread Your Needle
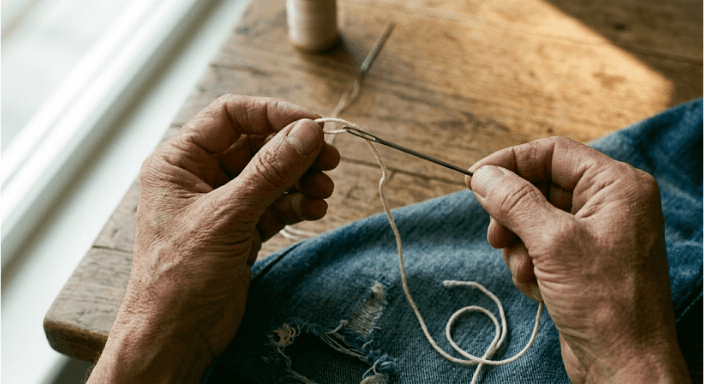
Cut about 24 inches of sashiko thread or perle cotton. Pull it through the eye of a sashiko or darning needle. Tie a knot at the long end. For mending purposes, a knotted start is fine. The knot lives on the inside of the garment and doesn’t show.
-
Step 4. Stitch Parallel Rows
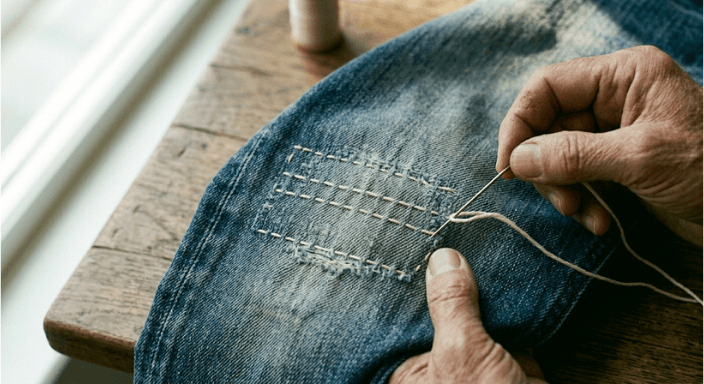
Working from the outside of the jeans, stitch parallel rows of running stitches across the patch area. Rows should sit roughly ¼ inch apart. Stitches should look like grains of rice, about 4 to 8 per inch, with the underside stitch about a third the length of the top stitch.
Don’t pull each stitch tight. Sashiko stitches need a tiny bit of slack so the fabric doesn’t pucker. Load three or four stitches onto the needle at once before pulling the thread through.
-
Step 5. End with a Knot, Leave Loops on the Back
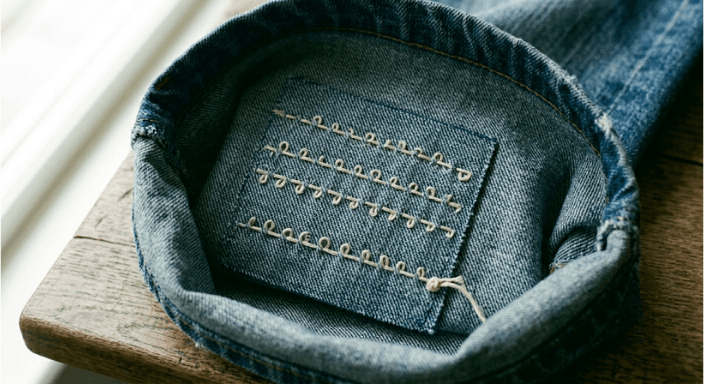
When you reach the end of a row and need to turn for the next, leave a small loop of thread on the inside of the garment between rows. This loop prevents the fabric from puckering when the thread relaxes after washing.
When you finish all the rows, take the needle to the inside, run it under three or four existing stitches on the back of the patch, then knot and trim. Pull the pins.
How Do You Darn a Hole in a Wool Sweater?
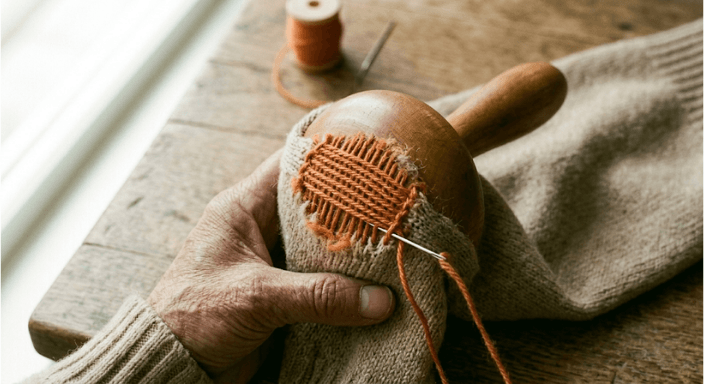
Darning is the other foundational mending and clothing repair skill. Where patching covers a hole, darning replaces the missing fabric by weaving thread across it.
Slide a darning mushroom or tennis ball under the hole to hold the surrounding knit flat. Stitch parallel lines of running stitch across the hole, anchored in solid fabric on either side, spanning the gap. Then weave perpendicular lines through the first set, going under one thread, over the next, building a small woven patch where the missing fabric was.
For wool sweaters, use wool yarn in a contrasting color. For cotton or cotton-blend knits, embroidery floss or perle cotton works. Don’t use sewing thread. It’s too thin to fill the gap.
When Will Your First Mend Fail? (And Why That’s Fine)
Mending is iterative, not finished.
Your first repair will last for about 20 wear-and-wash cycles. Then a stitch will pull, or the patch edge will lift, or a new hole will appear next to the old one. That’s when you re-stitch. The garment accumulates a record of repairs over time.
This is the boro tradition: layered stitching that builds up over the years, each repair a new layer on top of the last. One maker noted that the goal isn’t jeans that look brand new. It’s jeans that can keep being worn. That’s the standard. Not invisibility. Not perfection. Continued use.

- Length: 20m(21.8yard) per skain.
- Material: 100% cotton
- Imported from Japan
- Superior Japanese thread developed to use for Sashiko stitching. From beginners to experts, everybody can enjoy Japanese traditional stitching with soft feeling. They are used too for quilting and embroidery, knitting as well as Sashiko stitching.
Your First Mend Is Tonight
Pull one garment from your closet right now. Run the 60-second audit. If it passes, if you wear it, if you’ll keep wearing it, gather three supplies (thread, needle, scissors) and stitch one row before bed.
Pick One Garment You Actually Wear
Not a perfect repair. A first one. Mending and clothing repair are practices, not performances. The skill builds across garments, across seasons, across years of wonky, imperfect stitches that hold a wardrobe together longer than the fashion industry would prefer.
“It doesn’t have to look perfect. It can be wonky and flawed and your own.”
That’s the whole doctrine.
Check this video from ABC Australia – Visible mending brings new life to old, damaged clothes:
Frequently Asked Questions
-
What is visible mending and how do you do it?
Visible mending is repairing clothes in a way that shows the repair instead of hiding it, usually with contrasting thread, decorative patches, or running-stitch grids. You sew a patch over the hole or darn it with woven thread, treating the mend itself as a design feature rather than something to disguise.
-
What thread is best for visible mending?
Sashiko thread or perle cotton size 8 is best, due to its matte finish and durability. If you don’t have either, doubled embroidery floss works for most projects. Avoid thin all-purpose sewing thread; it snaps under wear in repaired stress zones and won’t survive washing.
-
Is sashiko hard to learn for beginners?
No. Sashiko uses one stitch, the running stitch, and it looks intentional even when uneven. The skill is consistency: aim for stitches the size of a grain of rice and keep them roughly the same length. Wonky is part of the look, not a failure of technique.
-
Why is my mending patch puckering?
Puckering usually occurs when the thread is pulled too tight or the fabric is stretched while pinning. Leave small thread loops on the inside of the garment when changing direction to allow for fabric movement, and re-stitch the puckered section more loosely.
-
Can you do visible mending on stretch fabric?
It is not recommended for beginners. Stretch fabric warps under the tension of woven patches and stiff sashiko stitching. Stick to non-stretch denim, canvas, linen, or wool knits for your first projects, then graduate to stretch repairs once you know how your tension behaves.
-
Should I mend this garment, or is it too far gone?
Pinch the fabric next to the hole. If it tears with light pressure, the surrounding fabric is too thin to hold stitches, and the mend will fail within a few wears. Mend garments where the worn area is localized, not garments where the whole panel is breaking down across multiple spots.
-
Where should I store mending projects between sessions?
Keep an active mending basket near where you sit in the evening, not in your sewing room. Visible mending earns its place in your routine when it’s accessible during ten-minute windows. A small basket with the current garment, needle, thread, and scissors is enough to keep the practice rolling


