

Your No-Sew Thrift Flip Starter Guide
Thrift flipping is the beginner-friendly way to upcycle clothes from secondhand stores using fabric glue, sharp scissors, and hem tape. No sewing machine required. This guide covers the essential no-sew toolkit, how to pick fabrics that won’t fight you, five beginner projects you can finish in one sitting, and the common mistakes that make thrift flips look homemade instead of intentional. Start with one clean alteration on a stable cotton or denim piece, and skip anything slippery until your third or fourth project.
What Is a Thrift Flip and Why Is Everyone Doing It?

A thrift flip is a simple way to turn secondhand clothing into something that looks more current, more flattering, or more personal to you. The appeal is practical. It saves money, reduces textile waste, and gives you a look no one else has.
A no-sew thrift flip is even more beginner-friendly because you can start with fabric glue, sharp scissors, and a little planning. You don’t need a machine or advanced skills.
The best pieces for thrift flip ideas are oversized shirts, denim, skirts, slip dresses, sweatshirts, and basic tees. Start with one simple change: shorten the hem, reshape the fit, swap sleeves, or add ties. If you want to upcycle clothes without spending much, this is one of the most accessible entry points in sustainable fashion.
“I spent $8 on a men’s button-down and $4 on fabric glue. That same look at a boutique was $78. I’m never going back.” — Reddit, r/ThriftStoreHauls
Why Thrift Flip Ideas Are Trending Right Now
Thrift flipping sits at the intersection of budget shopping and creative identity, and right now, both of those things matter more than they did a few years ago.
Shoppers are watching spending more closely. Secondhand clothing has never been easier to find, and the idea of turning a $3 button-down into something you’d actually wear to dinner feels satisfying in a way retail shopping doesn’t. It’s practical and personal at the same time.
The trend got a visibility boost from younger creators on social media, but the appeal stretches well beyond one age group. Anyone who’s ever stood in front of a closet full of clothes and felt like they had nothing to wear understands the core problem thrift flipping solves.
For readers who already enjoy alterations, fabric reuse, and beginner-friendly projects, this fits naturally into what you’re already doing. This guide covers what counts as a good flip, what supplies you actually need, how to pick the right secondhand pieces, five specific projects to try first, the most common mistakes to avoid, and how to turn the whole process into content or income if that’s where you want to take it.
What Counts as a Good Thrift Flip?
A good thrift flip improves fit, function, or style in a way that makes the garment more wearable for you specifically. The goal isn’t to force every secondhand piece into whatever is trending this month.
The goal is to find one clear, honest upgrade.
Good beginner projects start with shape, not decoration:
- An oversized tee becomes a fitted tie-back top.
- A man’s cotton button-down becomes a sleeveless shell or beach cover-up.
- Loose straight jeans become raw-hem cutoff shorts.
- A plain sweatshirt becomes an off-shoulder lounge top.
Simple changes almost always look more polished than garments that have been overcut or over-embellished. When you add too many changes at once, the final piece reads as homemade rather than intentional. Pick one strong alteration, execute it cleanly, and stop there.
What Supplies Do You Need for a No-Sew Thrift Flip?
A no-sew thrift flip doesn’t require a full sewing setup. A focused core kit is all you need to start.
The essentials and what they actually do:
- Fabric scissors. Sharp blades cut cleanly in one pass, which is the difference between a raw edge that looks intentional and one that looks frayed and uneven.
- Fabric glue. Bonds hems, raw edges, and trim on lightweight fabrics without heat or a machine. Works best on cotton, linen, and light wovens.
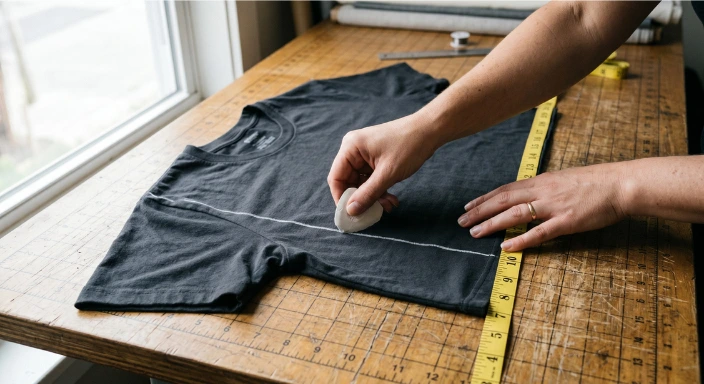
- Measuring tape. Keeps both legs of a pair of shorts symmetrical and prevents the most common cutting mistake: eyeballing a straight line.
- Tailor’s chalk or washable marker. Marks cut lines that disappear after washing, so you can plan before committing.
- Cutting mat. Protects the surface underneath and gives you a stable base for accurate cuts.
- Clips or pins. Hold folds in place while the fabric glue dries so you don’t end up with uneven hems.
- An iron. Pressing folds flat before gluing makes the bond stronger and the edge cleaner.
Optional extras worth having on hand: hem tape, a seam ripper, a ruler, decorative patches, and snaps or studs.
One practical note. Sharp scissors matter more than buying lots of extras. Fabric glue is excellent for lightweight edits and trim work. If you’re working with denim or thick seams, you may eventually need a few stitches, but most beginner projects don’t require it.
“I bought every gadget on the influencer’s list and still ruined my first flip. Sharp scissors and an iron did more than the $40 worth of extras.” — Reddit, r/sewing
French Seams Sewing Tutorial for Clean Finishes

- SEWING, ARTS, AND CRAFTS STAPLE: Fiskars RazorEdge SoftGrip Fabric Scissors for cutting a wide variety of materials including denim, leather, and multiple layers of fabric, with less effort and minimum hand fatigue
- PRECISION ART SUPPLIES: Premium, hardened, stainless steel blades feature a specially ground edge for maximum sharpness, tested to cut all the way to the tip
- LONG LASTING AND RELIABLE: A dependable addition to your quilting supplies and scrapbook supplies; Fiskars craft supplies and materials are built to last
- COMFORTABLE AND CONVENIENT: Ergonomic handle is sculpted to fit your hand for maximum cutting control and sensitivity, while Softgrip touchpoints increase comfort; Bent handle design keeps materials flat for mistake-free cutting
- QUALITY TOOLS FOR ARTS AND CRAFTS: From scissors and cutting mats, rotary and paper cutters, to classroom essentials, scissors for kids, and quilting and scrapbooking supplies, Fiskars crafting tools are designed to help you express yourself
How Do You Pick the Best Clothes to Upcycle?
Learning to upcycle clothes well starts at the thrift store, before you’ve cut a single piece.
The most important rule: choose good fabric first. Fit can be changed. Damaged or deteriorated fabric usually can’t.
Before anything goes in your cart, check for:
- Stains under the arms or collar
- A stretched-out or misshapen neckline
- Broken zippers that would be expensive to replace
- Thinning fabric around wear points (inner thigh, underarm seam)
- Twisted side seams, which signal the garment has been washed incorrectly many times
Best fabrics for first-timers:
- Cotton tees. Easy to cut, stable, and forgiving with glue.
- Denim. Holds its shape well and frays predictably.
- Linen blends. Drape nicely and cut cleanly.
- Stable wovens like cotton canvas or twill. Hold pressed folds without fighting you.
Harder fabrics to avoid on your first attempt:
- Silk and slippery satin. Shift during cutting and fray aggressively.
- Very stretchy knits. Hard to cut straight and prone to rolling.
- Bulky lined garments. Difficult to alter cleanly without a machine.
Choose pieces that are at least slightly too big. Extra room gives you options. Look for shape potential in the construction: extra length at the hem, wide sleeves, room in the waist, or oversized proportions that can be taken in or cropped.
The best pieces to upcycle clothes from aren’t always the most visually interesting on the rack. Sometimes the plainest garment, in a good fabric, with room to work, is the most useful starting point.
5 Easy Thrift Flip Ideas You Can Try First
Ready to start? These thrift flip ideas are sequenced for first-timers. Each one teaches a transferable skill and can be completed in one session without a machine.
1. Oversized T-Shirt to Tie-Back Crop Top
Best for: Soft, stable cotton tees with enough length to work with.
Mark your new hem length before you cut, and cut at least an inch below where you want the final crop to sit. Use the extra fabric at the bottom to cut two narrow strips for the back ties. Knot them at the center back for a fitted silhouette that doesn’t require any glue.
Mistake to avoid: Cropping too high, too fast. Cut conservatively on the first pass. You can always remove more fabric, but you can’t put it back.
2. Button-Down Shirt to Sleeveless Summer Top
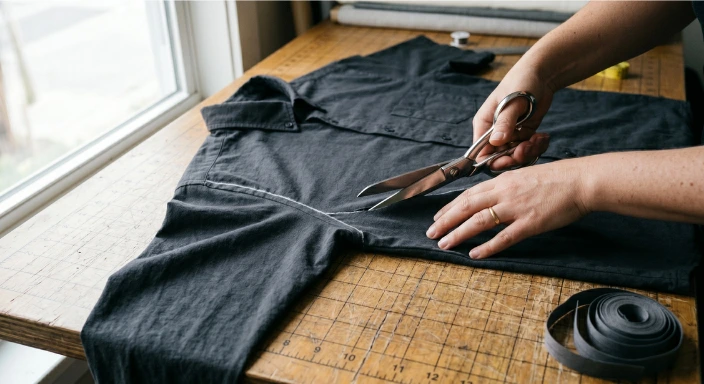
Best for: Men’s cotton button-down shirts, which tend to have more fabric and more relaxed proportions than women’s cuts.
Remove the sleeves by cutting along the armhole seam. Fold the raw armhole edge inward by about a half inch and secure with hem tape or fabric glue, pressing as you go. For extra polish, shorten to hip length before finishing the hem.
Mistake to avoid: Cutting too close to the original seam. Leave a small allowance when you make your first cut so you have room to fold cleanly.

- CREATE CLEAN, PROFESSIONAL HEMS WITHOUT SEWING – Whether you're tailoring pants, adjusting curtains, or finishing a dress, this hem tape iron on design offers a quick, no-sew solution that saves time and delivers lasting results. Perfect for anyone seeking a stress-free hemming method with a polished finish.
- SUPER WEIGHT BOND FOR HEAVIER FABRICS – Designed specifically for thicker materials like denim, wool, suede, corduroy, and heavy cotton, this hemming tape for curtains ensures a strong and secure hold that won’t come undone with wear or washing.
- IRON-ON, DOUBLE-SIDED ADHESIVE – Similar to sewing tape, this product bonds two layers of fabric together with heat, eliminating the need for needle and thread.
- EASY TO USE – Just place the tape between fabric layers and press with an iron. The hem tape for pants requires no sewing, pinning, or extra tools required.
- VERSATILE APPLICATION – Ideal for hemming garments like pants, skirts, and dresses, as well as home décor items like curtains, pillowcases, and fabric organizers.
3. Jeans to Raw-Hem Shorts

Best for: Straight-leg or relaxed-fit denim with a stable weave.
Try the jeans on first, mark the final length while standing, and add at least two inches below that mark before you cut. This gives you room to adjust. Once you’re satisfied with the length, fray the hem slightly by running a seam ripper along the bottom edge and pulling out a few horizontal threads.
Mistake to avoid: Cutting both legs without checking symmetry. Measure and mark each leg individually. The original hem on most jeans is not perfectly even
4. Sweatshirt to Off-Shoulder Lounge Top
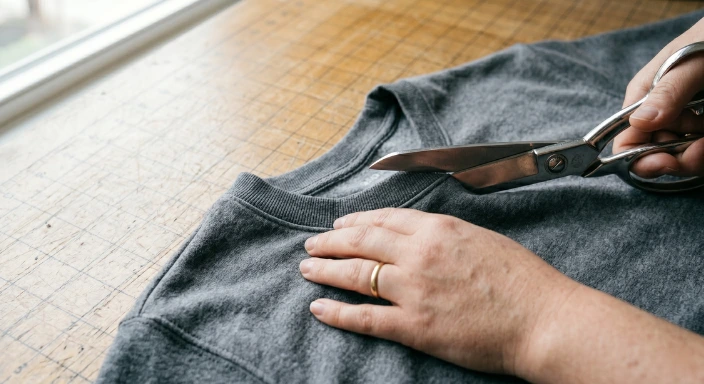
Best for: Oversized fleece or jersey sweatshirts with a wide enough body to allow a dropped neckline.
Widen the neckline by cutting gradually from the center toward each shoulder, checking the drape after each pass. Keep the first cut shallow and test how the fabric falls before trimming further. You can also crop the hem for a shorter silhouette, but do that after the neckline is finalized.
Mistake to avoid: Making the neckline too wide in one cut. Once you’ve gone past the shoulder seam, you’ve lost the structure that holds the off-shoulder shape in place.
5. Slip Dress to Skirt or Layering Piece
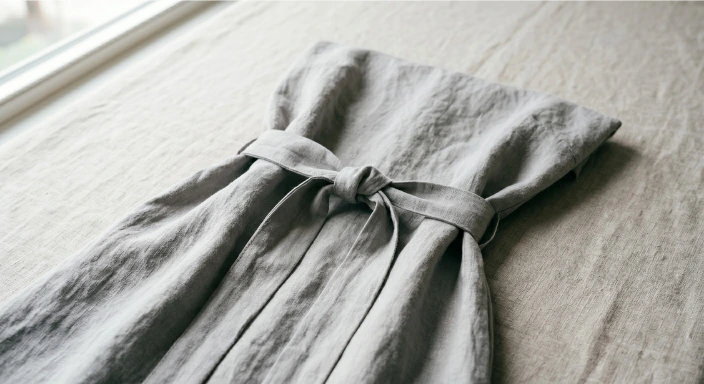
Best for: Simple thrifted slip dresses in a stable, non-clingy fabric. This is one of the more versatile thrifted clothes makeover options because it requires no cutting at all if you’re folding and tucking.
Fold the bodice section down toward the waist and secure it with a wide belt or fabric tie to create an instant midi skirt. Alternatively, shorten the hem for easier layering under oversized shirts or blazers. Use accessories, belts, and ties as styling helpers rather than cutting until you’re sure of the result.
Mistake to avoid: Choosing clingy or slippery fabric for your first attempt at this style. A fabric that slides around makes folding and tucking impossible to control.

- No sew fabric glue
- Aleene's glue
- This product is manufactured in united states
- Not intended to permanently adhere washable, wearable projects.
- Use to create quick costumes, hem garments and make temporary stitching.
Fix This: Common Thrift Flip Mistakes That Make Clothes Look Homemade
Most thrift flip results that look unfinished come down to a few repeatable problems.
The most common mistakes:
- Cutting before trying the item on
- Ignoring grainline and drape direction when making cuts
- Using scissors that aren’t sharp enough to cut cleanly in one pass
- Using fabric glue on heavy denim or thick seams that actually need stitching
- Copying a cut or style that doesn’t suit the garment’s actual shape
- Not pressing folds flat before finishing
Here’s how to fix the ones that come up most often:
- If the neckline looks stretched after cutting: You took too much and destabilized the edge. Trim less on future attempts, and stabilize any raw neckline edge with a thin line of fabric glue folded under before it has a chance to stretch further.
- If the hem curls up instead of lying flat: Press it with an iron first. A curl almost always means the fold hasn’t been set before the glue went on. Re-press, re-fold, and re-glue.
- If the garment feels flimsy after cutting: The cut removed too much structural fabric. Add stability by folding the raw edge back on itself to create a facing, or reinforce with hem tape along the inside.
The cleanest flips are almost always the simplest ones. One deliberate change, done well, reads as intentional. Multiple small changes done quickly read as an experiment.
“I stopped trying to make three changes per garment, and my results got instantly better. One cut. One fold. Done.” — PatternReview.com forum
Eco-Friendly Projects: Creative Ways to Reduce Waste and Save Money
How Can You Make Money From Thrift Flip Content?
Thrift flips work well as before-and-after content because the transformation is visual and easy to follow. That makes them well-suited to platforms that reward short-form visual content.
Where thrift flip content performs:
- Pinterest responds well to transformation graphics and step-by-step tutorial layouts, especially when the before-and-after images are clearly labeled.
- TikTok and Instagram Reels reward simple process content where the result is visible within the first few seconds.
Natural affiliate angles for thrift flip content:
- Fabric scissors
- Fabric glue and hem tape
- Cutting mats
- Beginner alteration tool kits
Broader monetization options:
- A downloadable thrift flip checklist for thrift-store shopping
- Transformation templates for content creators
- A curated tool list for beginners
- Branded merchandise aimed at regular thrifters
Readers who enjoy thrift flip ideas often find that alteration tutorials and beginner sewing upgrades are natural next steps once the no-machine projects start feeling too simple. That progression from glue and scissors to a machine is a well-documented path in the beginner sewing community, and the content opportunities follow the same arc.
Thrift Flipping Is the Easiest Way to Make Fashion Feel Personal Again
Thrift flipping works because it asks very little at the start. You don’t need a sewing room, a machine, or a background in construction. You need a piece of secondhand clothing with potential, a clear idea of one thing to change, and the patience to cut slowly.
The first goal isn’t a perfect garment. The first goal is learning what makes something more wearable for you specifically: a better length, a more fitted silhouette, a neckline that doesn’t pull. That knowledge carries into every project after this one.
Thrift flipping is also a quiet form of textile upcycling that keeps wearable clothing out of landfills. The environmental math favors any garment you actually wear over any garment you buy new, and thrift flipping makes more of your closet wearable without the guilt that often follows a retail haul.
Check this video from Bianca Gover: Easy SPRING Thrift Flips (No Sewing Pattern Needed!)
Frequently Asked Questions
-
What is a thrift flip?
A thrift flip is the process of changing a secondhand item so it fits better, looks more current, or suits your style. Most flips involve one clear alteration, not a full reconstruction. Beginners usually start with cutting, folding, and gluing instead of sewing, which keeps the learning curve manageable and the supply list short.
-
Can you do a no-sew thrift flip?
Yes. Many beginner projects use fabric glue, hem tape, and careful cutting instead of any stitching, and those methods work well on lightweight fabrics. No-sew techniques hold up best on cotton, linen, and light wovens. For denim or thick seams, a few hand stitches eventually add durability that the glue alone can’t match.
-
What clothes are easiest to thrift flip?
Oversized tees, denim, button-downs, sweatshirts, and simple dresses are the easiest starting points. They’re stable, forgiving, and widely available at low cost in most thrift stores. Stick to cotton and denim for your first three projects before trying anything silky, stretchy, or lined. Those fabrics are harder to cut cleanly without a machine.
-
Is thrift flipping cheaper than buying new clothes?
Usually yes, especially when you start with affordable secondhand basics and keep your supply list to the essentials: scissors, glue, and hem tape. A full beginner kit runs about $25 to $40 one time. After that, most flips cost $3 to $10 per garment, which is a fraction of the retail equivalent.
-
How do you make a thrifted clothes makeover look polished?
Measure before you cut, move slowly, press every fold before finishing, and limit yourself to one strong change per garment instead of several quick ones. The finish on any flip comes from pressing, not cutting. Skipping the iron is the single most common reason flips look homemade instead of intentional.
-
What’s the biggest beginner mistake when trying to upcycle clothes?
Cutting too much too quickly without testing the fit first. Once the fabric is gone, the alteration can’t be undone, so conservative cuts on the first pass always win. Cut an inch longer than you think you need, try the garment on, then trim again. Most ruined flips come from one rushed cut.
-
Can you sell thrift flip content or projects online?
Yes. Thrift flip tutorials, before-and-after photos, and curated supply lists support both content monetization and affiliate income, particularly on Pinterest and short-form video platforms. Selling the finished garments themselves is harder because of sizing and pricing constraints, but tutorials and digital downloads scale better than physical resale.
“Seam” to have a preference? Tell us why in the comments.


