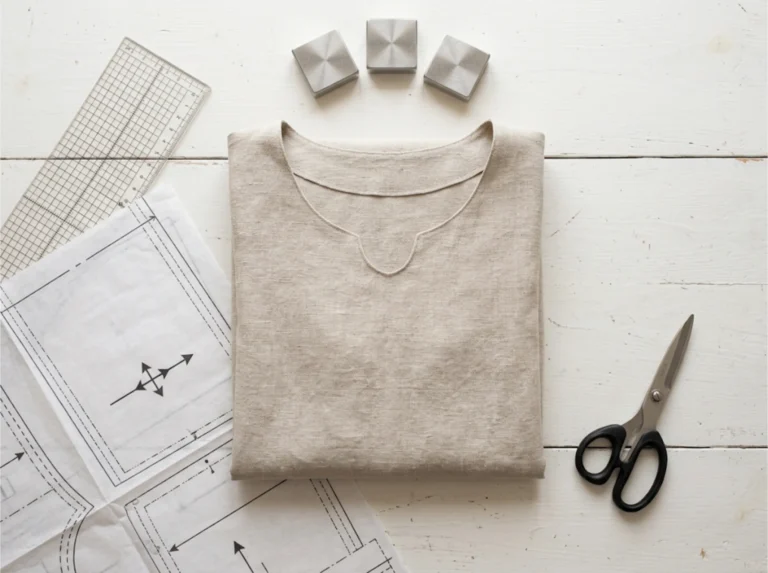

There’s nothing better than slipping into a soft cover-up after a swim. If you’re looking for something that feels cool and doesn’t cling, a beach kimono checks all the boxes. This wrap gives you just enough coverage and won’t weigh you down. More importantly, it dries fast in the sun and works with whatever swimwear you’re wearing underneath. Let’s make a kimono for your next beach trip!
TL;DR: DIY Beach Kimono: Easy Sewing Tutorial
- Shows how to sew a lightweight, flowy beach kimono using simple rectangular pieces, perfect as a swim cover-up or summer layer.
- Beginner-friendly: the project uses straight seams, basic hemming, and simple side openings, making it quick to finish.
- Recommends sheer or breathable fabrics like chiffon, rayon, or lightweight cotton to create a breezy, draped look.
- Offers customization options such as length changes, sleeve width adjustments, trim, or tassels for a personalized style.
Related: Make A Classy DIY Kimono In 30 Minutes Or Less!
What You’ll Need:
- 1 yard lightweight fabric
- Bias tape for the neckline
- Fabric scissors
- Fabric chalk or washable marker
- Measuring tape
- Straight pins
- Sewing machine
- Iron
- Small hook-and-eye or tie closure
Make Your Own Beach Kimono
A beach kimono gives you an easy layer to throw on when you’re moving from the pool to the boardwalk. Here’s how to make one:
Choose Your Fabric and Prep the Square
Before you start, pick a fabric that stays breathable in warm weather and moves softly when worn. Popular options include cotton, rayon, and linen.
Step 1: Lay your fabric flat with the printed or “right” side facing inward. Fold it in half horizontally to create a square shape, matching the edges as closely as possible.
Step 2: Measure and cut a square shape. 38” x 38” works for a tunic length, but adjust as needed for your height.
Step 3: Locate the top folded edge of your fabric square. This fold will become the neckline, so mark the cente,r then measure 5 inches out to each side. Cut between those two marks along the fold to start opening the neckline.
Shape the Neckline and Finish the Edges
This section is where you set the overall shape of the kimono.
Step 4: Cut along the fold between your two marks to make the neck hole.
Step 5: Trim the top fabric layer to shape the front neckline. You can cut a gentle V, a curved scoop, or a straight slit, depending on how open you want the front to be. Keep the cut about 10” deep or less to start.
Step 6: Finish the neckline with bias tape. Pin the tape around the raw edge, then sew it down carefully with straight stitching.
Step 7: Fold the raw edges of your fabric inward twice, about ¼ inch each time, and press with an iron. Then sew along the folded edge to create a clean hem. Do this on all the open edges except the neckline.
Fold, Pin, and Stitch the Sides
This stage is where you shape the sides and create space for the arm openings.
Step 8: Unfold your fabric completely, then fold it in half once more with the finished neckline at the top and right sides facing out. Make sure the neckline sits flat and centered at the fold.
Step 9: From the outer edges of your folded fabric, measure in 8 inches toward the center. Then measure down 9 to 10 inches from the top folded edge. These marks will help place the arm openings of the kimono.
Step 10: Starting just below each armhole mark, use pins or chalk to mark a straight vertical line down to the bottom edge of the fabric. Repeat on the other side so your seams match.
Step 11: Sew along the marked lines and leave the armhole space open. The structure of the kimono is now complete!
Add Finishing Touches and Wear It Out
You can add small details that improve the fit or reflect your style.
Step 12: To add a closure, sew in a small hook-and-eye at the V-neck.
Step 13: If you want to further decorate your kimono, sew trim along the bottom edge or add tassels to the corners. You can also use fabric paint to create a custom print on the back or sleeves.
Step 14: Press all the sewn edges with a warm iron to smooth them out. When you try on the kimono, check the armhole size and side seams. Make small adjustments if the fit feels too snug or too loose.
Beachwear Just Got an Upgrade
A beach kimono feels light in hot weather and is easy to throw on after a swim. You can also wear it loose for airflow or tie it closed when you want more coverage. It’s the kind of piece that you can wear on vacation mornings and weekend afternoons.
What fabric are you picking for yours?
FAQs
- What is a beach kimono?
A beach kimono is a loose, lightweight cover-up worn over swimwear. - Do I need a pattern to make a beach kimono?
No pattern is needed—this tutorial uses simple measurements and cuts. - What fabric works best for a beach kimono?
Lightweight fabrics like cotton, rayon, linen, or chiffon are ideal. - How much fabric do I need?
You’ll need about 1 yard for a shorter length; use more if you want a longer fit. - Can beginners sew this project?
Yes, this is a beginner-friendly project using only basic sewing steps. - What is bias tape used for in this tutorial?
Bias tape finishes the neckline neatly and helps it hold shape. - How do I make armholes in the kimono?
You’ll measure from the top fold and side edges, then sew along marked lines to form the shape. - Do I need to add a closure?
No, it’s optional. You can add a hook-and-eye or leave it open. - How long does it take to make?
Most sewists can finish it in one afternoon. - 10. Can I customize the kimono with extras?
Yes, you can add trim, tassels, or fabric paint after sewing.