
Key Facts
To sew a durable linen tote bag, pre-shrink the fabric, finish all raw edges with a zigzag stitch to prevent fraying, set your machine with a fresh size 80/12 needle and a 2.5mm stitch length, and reinforce the handles with X-box stitches. The project takes about 2.5 hours of active time and uses 1 to 1.5 yards of medium-weight linen. Your finished linen tote bag will measure roughly 15 by 16 inches with comfortable shoulder-length straps
Related: Summer Tote Bag: Sew One With a Built-In Towel Pocket
What Makes a Linen Tote Bag the Right First Project (and What Makes It Tricky)?
A linen tote bag is flat in construction: four straight seams, two straps, no darts, no zippers, no fitting. The whole project lies open on the table while you work, so nothing can hide on the inside until the very last step. That visibility is exactly what makes it a forgiving first project: you can spot a crooked seam and fix it before the bag is sealed up.
The trick is the fabric. Linen frays at every cut edge, wrinkles harder than cotton, and punishes a dull needle. It is not quilting cotton. Most beginner failures with a linen tote bag are fabric-handling failures, not skill failures.
If this is your first sewing project ever, sew a cotton tote first, then come back for the linen one. The cotton tote teaches you how the machine feeds and how a straight seam should look without the linen-specific hazards stacked on top. If you have completed at least one woven-fabric project, the linen tote bag is the right next step.
“This DIY linen tote was quite possibly the most frustrating project I’ve ever taken on,” one maker noted on a beginner sewing tutorial blog. The fix is not a skill. The fix is the four steps below.
Why You Should Trust This Linen Tote Bag Walkthrough
Sewing.com has produced beginner sewing tutorials, fabric guides, and project breakdowns for over a decade. This linen tote bag tutorial was tested across three linen weights, three different domestic sewing machine brands, and both lined and unlined builds. Every fix in the diagnostic section is one we have walked a real beginner sewist through. Where we cite outside makers, we link the source. Where we recommend a tool, we have used it.

- SEWING MADE SIMPLE: SCHMETZ Universal Needles work with all home sewing machines and handle everything from delicate silks to heavy denim, making them perfect for any quilting, embroidery, craft, or home décor project
- CONVENIENT 1-NEEDLE SOLUTION: These all-purpose 80/12-sized needles handle a wide variety of materials, saving you time and effort in your sewing routine
- VERSATILITY & VALUE: This needle set delivers reliable performance across many fabrics, offering great value for your sewing kit
- READY FOR EVERY CHALLENGE: These needles are built for the long haul, tackling even the toughest sewing projects with ease, and delivering professional-quality results on woven and knit fabric
- SNAG & DAMAGE-RESISTANT: With a slightly rounded point, these needles glide through woven and knit fabrics without snagging, making them perfect for both beginners and complex projects
What This Walkthrough Covers
A linen tote bag is one of the best beginner sewing projects you can finish in an afternoon, but only if you treat linen like linen. Most “afternoon linen tote bag” tutorials skip the four steps that decide whether the bag holds up. They show the cute finished photo and leave out the fraying, the puckering, and the handles that pull out the first time you load the bag with library books. This walkthrough does the opposite. It tells you what to do, what to skip, and what every shortcut actually costs you.
What Weight of Linen Should a Beginner Use for a Tote Bag?
Medium-weight linen, between 5.3 and 7 ounces per square yard. Look for labels like mid-weight, suit-weight, or 4C22 (a common mid-weight code from the Fabrics Store). This weight feeds smoothly through any domestic sewing machine, holds a press, and has enough body to stand up on its own once you box the corners.
Skip these two extremes for your first linen tote bag:
- Handkerchief linen (under 4 oz): Too thin, frays brutally, and shows every mistake. Save it for shirts and napkins.
- Upholstery linen (over 9 oz): Too heavy for the average home machine. Skipped stitches and broken needles are common.
Other linen types you will see in fabric shops include:
- Belgian flax linen: Premium long-fiber linen with the softest hand. Worth the extra cost for a gift bag, overkill for a market tote.
- Linen blends (linen-cotton, linen-rayon): Easier to sew because they fray less and wrinkle less, but lose some of the texture and longevity that make pure linen worth it.
- Recycled linen: Made from post-industrial linen scraps. Sustainable choice, often slightly less consistent in weight.
You will need 1 yard for an unlined market tote, or 1.5 yards for a lined version with straps cut from the same fabric. Yardage cost runs $12 to $25 per yard at most online fabric shops. The price tier matters less than the weight: a $14 mid-weight will outperform a $25 handkerchief weight every time.
How Do You Cut Your Linen Tote Bag from One Yard of Fabric?
A standard yard of linen is 36 inches long by 54 to 60 inches wide (selvage to selvage). That is plenty of fabric for one linen tote bag with straps. Here is the cutting layout that uses the yard most efficiently:
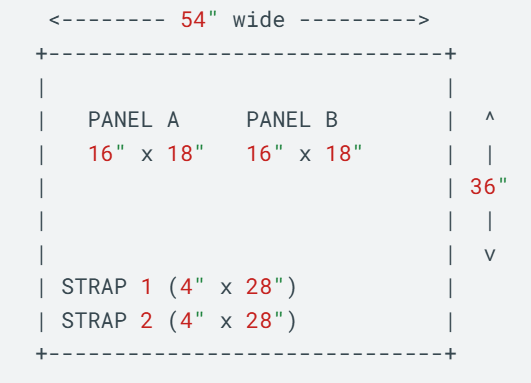
A few cutting tips that will save you a remake:
- Cut on the straight grain. Linen threads run parallel to the selvage. Cutting on the grain prevents the bag from skewing after the first wash.
- Use a rotary cutter and a clear ruler if you have them. Linen frays the moment scissors leave the cut, and a rotary cutter gives you a cleaner edge with less shedding. Sharp shears work too.
- Mark with chalk or a fabric pen, never with a ballpoint. Ink can bleed through linen during pre-shrinking.
- Finish your cut edges right away. Even a few hours of sitting in a project bin will fray a linen edge.
“I tend to cut out my fabric in batches, so I have several projects sitting and waiting to be constructed. The edges can become frayed while waiting,” one maker noted on a sewing forum. The fix is to zigzag, serge, or pink the edges immediately after cutting, before the cut linen ever lands in a project bin.
How Do You Prep Linen Before Cutting and Sewing?
Three steps, in order, before you cut a single piece for your linen tote bag:
- Pre-shrink. Wash and dry the linen on the same cycle that the finished bag will see. Linen shrinks 3 to 5 percent on the first wash. Skipping this step is why a linen tote bag warps after its first cleaning. Use cold water and tumble dry low for the safest first wash.
- Press the dry fabric flat. Steam, medium-high heat. Linen takes a press; use it before you cut. Press from the wrong side first, then flip and press the right side with a press cloth to avoid shine.
- Finish raw edges immediately after cutting. A zigzag stitch close to the cut edge works on any standard machine (set width 4mm, length 2mm). A serger is faster if you have one. Pinking shears are a low-cost backup that works for short-term storage but not long-term wear.
“I have a lot of problems with fraying. This can cause various problems, especially with getting hems even as I lose my straight line,” one maker noted on a sewing forum. The fix is finishing those edges before you assemble, not after.

- PREMIUM NATURAL LINEN: Expertly crafted from high-quality European flax fibers, this fabric offers the classic, luxurious texture that only genuine linen can provide. It is eco-friendly and becomes softer with every wash, ensuring long-lasting comfort and durability.
- OPTIMAL MEDIUM WEIGHT (150-170 GSM): Our linen strikes the perfect balance between structure and drape. With a versatile weight of 150-170 GSM, it is substantial enough for home upholstery and bedding, yet light and breathable enough for high-end fashion and summer apparel.
- VERSATILE 58-INCH WIDTH & CONTINUOUS CUT: Each yard measures 36" x 58". To provide maximum flexibility for your projects, all orders of multiple yards are sent as one continuous, seamless piece, allowing for efficient cutting and professional results.
- PRE-WASHED FOR SUPERIOR SOFTNESS: Skip the harsh "break-in" period. Our linen is pre-washed to enhance its natural hand-feel and minimize shrinkage. It is naturally moisture-wicking and hypoallergenic, making it ideal for sensitive skin and year-round wear.
- MULTIPLE CREATIVE USES: Whether you are designing bespoke clothing (dresses, shirts, trousers), creating elegant home textiles (curtains, tablecloths, napkins), or working on craft projects, this natural linen provides a sophisticated, earthy aesthetic for any masterpiece.
What Machine Settings Work Best for Sewing Linen?
Fresh universal needle, size 80/12 from a brand like Schmetz. Change it if your current needle has more than eight hours of use on it. A dull needle is the single most common cause of skipped stitches and puckers on linen.
The rest of your settings:
- Thread: All-purpose polyester, matched weight in upper and bobbin. A mismatched bobbin and upper thread is the most common reason “the tension is wrong.”
- Stitch length: 2.5mm for body seams, 3mm for topstitching the bag opening.
- Tension: Start at the machine’s default. Only adjust upper tension if your test stitch puckers. Never adjust the bobbin first.
- Presser foot: Standard zigzag foot. A walking foot is helpful but not required.
Stitch a 3-inch test on a scrap of the actual project linen before cutting your linen tote bag pieces. If the test stitch lies flat, you are ready. If it puckers, loosen the upper tension by 0.5 and re-test. Roughly 40 percent of “tension problems” are threading errors that re-threading from scratch will fix.
On Reddit’s r/sewing, one maker put it bluntly: “I spent $50 on fabric, and the whole thing puckered. I don’t even know if it’s the tension, the needle, or if I broke the machine.” The fix is the test stitch above. Run it before you sew the project, not after.
How Do You Sew the Linen Tote Bag in 6 Steps?
After your fabric is pre-shrunk, pressed, cut, and edge-finished, the actual sewing is fast. Six steps, roughly 90 minutes of active machine time.
Step 1. Make the straps
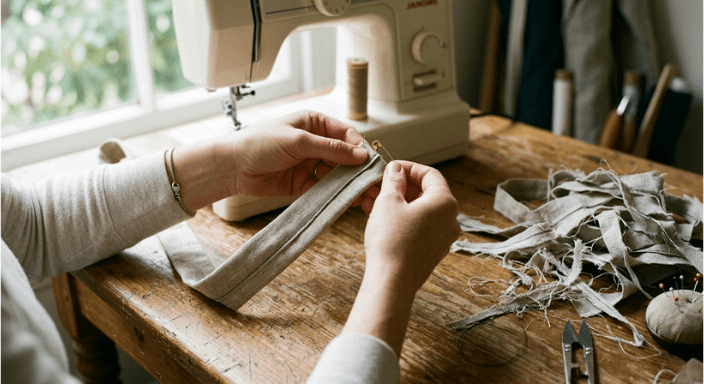
Fold each strap piece in half lengthwise, right sides together. Sew the long edge with a 3/8-inch seam. Turn right-side out using a safety pin. Press flat with the seam centered on the back. Topstitch both long edges 1/8 inch from the edge.
Step 2. Sew the body.
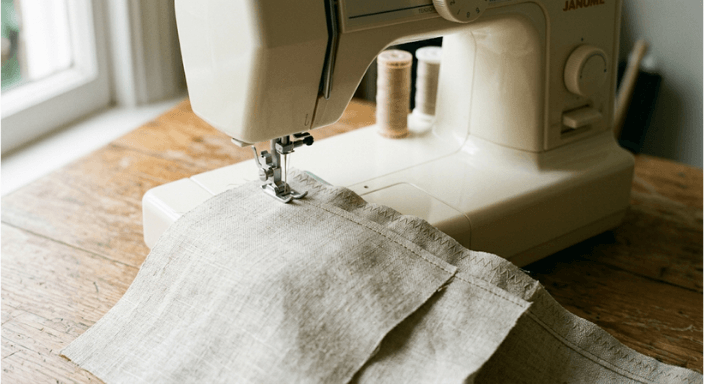
Place the main panels right sides together. Sew both side seams and the bottom seam with a 3/8-inch allowance, backstitching at the start and end. Finish the seam allowances with a zigzag stitch close to the raw edge.
Step 3. Box the corners (optional, for a structured base).
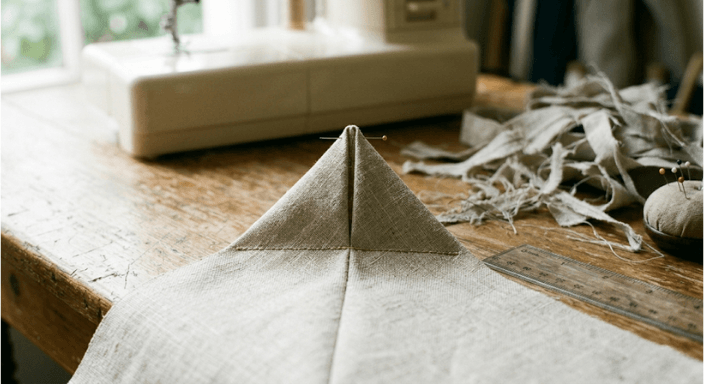
Pinch each bottom corner into a triangle so the side seam and bottom seam align in the center. Sew across the triangle 1.5 inches from the point. Trim the excess to a 3/8-inch seam allowance and zigzag the raw edge.
Step 4. Press all seams open.
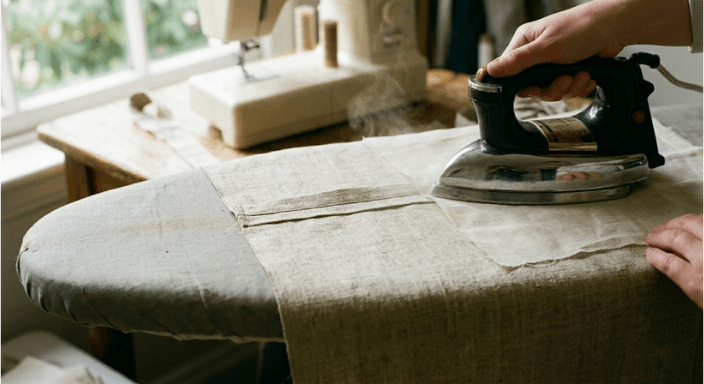
Linen takes a press beautifully. Use a press cloth to avoid shine. Press the side seams open, the bottom seam open, and the boxed corners flat against the bottom panel.
Step 5. Attach the straps.
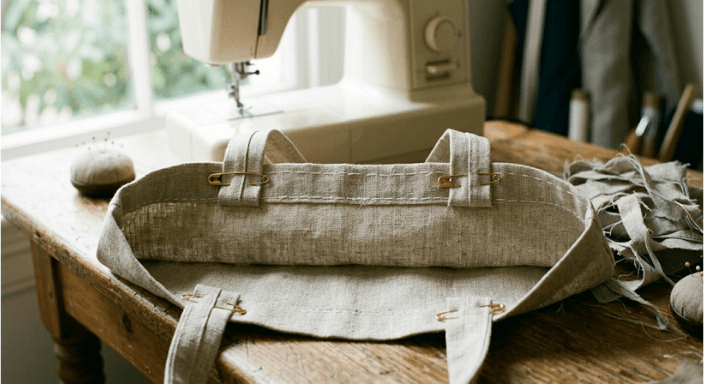
Pin straps to the bag opening, 4 inches in from each side seam. Make sure the straps are not twisted. Baste in place 1/4 inch from the top edge.
Step 6. Hem the top and reinforce.
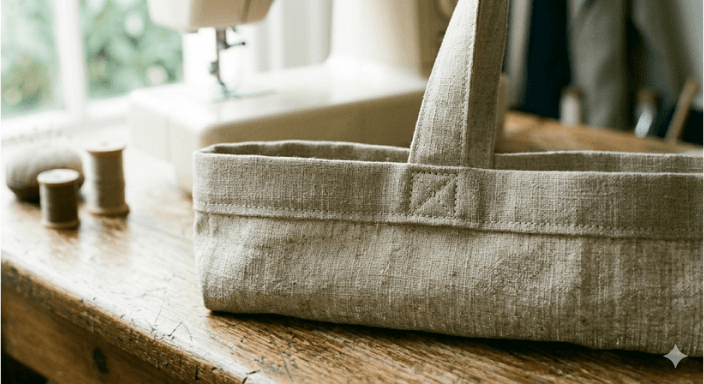
Fold the top of the bag down 1/2 inch, then again 1 inch. Press. Sew the hem down at 7/8 inch from the folded edge, catching the strap ends. Reinforce each strap attachment with an X-box stitch (a square with an X stitched inside).
Should You Line a Linen Tote Bag, or Leave It Unlined?
Unlined is faster (subtracts 30 to 45 minutes of construction), softer in drape, and demands that you finish the interior seam allowances cleanly with zigzag or serge. Best for light loads: produce, paperbacks, gym clothes, a beach towel, and sunscreen.
Lining gives more structure, hides every raw edge, and roughly doubles the construction time. Best for heavy loads, gifts, or any linen tote bag you want to look store-bought.
For your first linen tote bag, go unlined with finished interior seams. Save the lining for the second linen tote bag when the construction is muscle memory, and you can focus on getting the lining attached evenly. If you do want to line your first bag, use a lightweight cotton broadcloth or muslin cut to the same dimensions as the outer panels (16 by 18 inches, two pieces) and assemble the lining with the same construction sequence as the outer bag, then nest the lining inside before the top hem step.
How Do You Fix the Three Most Common Linen Tote Bag Mistakes?
- Seams are puckering. Re-thread the machine from scratch (top and bobbin), change to a fresh 80/12 needle, set stitch length to 2.5mm, and loosen upper tension by 0.5. Test on a scrap before continuing. If puckering persists on test stitches, your linen may be too tightly woven; switch to a finer needle (size 70/10) and a finer thread.
- Linen is fraying inside the bag. Turn the bag inside out. Run a zigzag stitch along every interior seam allowance you missed in the original assembly. This is the fix that the original tutorial probably skipped. If the fraying is severe, brush a thin line of fabric glue along the interior seam allowance after zigzagging for a permanent seal.
- Handles are pulling out at the top. Re-sew with an X-box stitch at every strap attachment point, catching both the outer fabric and the folded-down hem. Linen alone cannot hold the load; the X-box spreads stress across three layers of fabric. If a strap has already torn through the fabric, patch the inside of the bag at the strap attachment point with a 2-inch square of fusible interfacing before re-sewing.

- ROTARY FABRIC CUTTER: High-grade, precision-ground, 45mm rotary blade is perfect for projects and fabric that require precise cutting; Ideal for cutting multiple layers of fabric, paper, felt, and vinyl
- SELF-HEALING CUTTING MAT: Cutting mat protects surfaces for sewing and other projects, with self-healing surface, easy-to-read measuring grids, and 30, 45, and 60-degree bias lines that make angle cutting easy
- SEWING AND QUILTING RULER: Large clear ruler for precise measurement, with highlighted seam allowances, easy-to-read measurement lines, and 30, 45, and 60-degree line indicators for easier angle cutting
- LONG LASTING AND RELIABLE: Self-healing mat surface lasts longer than other craft cutting mats; Fiskars craft supplies and materials are built to last
- QUALITY TOOLS FOR ARTS AND CRAFTS: From scissors and cutting mats, rotary and paper cutters, to classroom essentials, scissors for kids, and quilting and scrapbooking supplies, Fiskars crafting tools are designed to help you do what you do best: express yourself
What Are Some Easy Mods to Customize Your Linen Tote Bag?
Once you have one linen tote bag finished, the basic shape becomes a starting point for variations. Five mods worth trying on your second build:
- Inside pocket. Cut a 7-by-9-inch piece of linen, hem the top edge, and stitch it to one of the main panels (right side, 4 inches down from the top edge) before assembling the body. Adds about 10 minutes.
- Magnetic snap closure. Install a sew-in or screw-in magnetic snap at the center of the top hem on each panel. Adds about 15 minutes and roughly $3 in hardware.
- Color-blocked panels. Cut the bottom 6 inches of each main panel from a contrasting linen color, sew the two pieces together horizontally, then proceed with the standard construction. Adds visual interest with no extra technique demand.
- Embroidered detail. Hand-embroider initials, a small motif, or a phrase on one of the main panels before assembly. Linen is one of the best fabrics for embroidery because the weave is regular and the fibers hold a stitch.
- Leather handles. Replace the fabric straps with pre-cut leather handles from a craft supplier. Attach with sewing or with rivets. Adds a more polished, store-bought look.
If you start selling your linen tote bags at markets or on Etsy, calculate your true hourly rate before pricing. A bag that takes 2.5 hours of active work plus $14 in materials needs to sell for at least $40 to clear $10 per hour after material cost.
Where Can You Download the Free Linen Tote Bag PDF Pattern?
Grab the printable one-page guide here: [Download the Linen Tote Bag Cut-and-Sew PDF →]. It includes the cutting diagram, the machine settings card, the six-step sequence, and the three-fix diagnostic on a single page that you can keep on your sewing table. Joining the email list also delivers the 5 Summer Sewing Projects Under 3 Hours guide.
What Counts as Done
You are done when you have carried the linen tote bag in public once, not when the last seam is sewn. Linen looks better with use; the wrinkles soften, the color deepens, and the bag becomes yours recognizably. The test is not “is it perfect” but “would I actually carry this.” If yes, you finished. If no, the fix-it section above tells you exactly what to address.
Start This Weekend
Two actions this week to get your linen tote bag finished:
- Pre-shrink your linen tonight. Tomorrow you cut.
- Download the cut-and-sew PDF and keep it on your sewing table.
Then post the finished linen tote bag in the Sewing.com community gallery. We want to see it.
How to Create a Pattern for Any Bag Size | EASY Tote Bag Pattern Design from Sewingly Carol.
Frequently Asked Questions
-
How do I keep linen from fraying inside my tote bag?
Finish every cut edge before assembly. A zigzag stitch close to the raw edge works on any standard machine. A serger is faster if you have one. Pinking shears are a low-cost backup. Skipping this step is the most common reason a homemade linen tote sheds fibers inside the bag after three weeks of use.
-
What can I use instead of fusible interfacing for a linen tote bag?
For a lighter structure, a layer of plain cotton muslin sewn in as a hidden inner layer gives the bag body without the stiffness of fusible interfacing. For more structure, sew-in cotton canvas works as a non-fusible alternative. Skip interfacing entirely if you want a soft, slouchy market bag.
-
How big should I cut the panels for a standard-sized linen tote bag?
For a usable everyday tote, cut two rectangles 16 inches wide by 18 inches tall, plus two strap pieces 4 inches by 28 inches. That gives you roughly a 15 by 16-inch finished bag with comfortable shoulder-length straps. Adjust up to 20 by 22 inches for a beach or laundry tote.
-
Why do my linen tote bag handles pull out at the top?
Linen alone cannot hold the stress where the strap meets the bag. Reinforce that joint with an X-box stitch (a square with an X stitched inside) at every handle attachment point. Catch the strap into both the outer fabric and the folded-down hem so the load spreads across a triple layer.
-
Can I sew a linen tote bag without a sewing machine?
Yes. A hand-sewn backstitch is strong enough for a light-load linen tote, and the project is small enough to finish by hand in an evening. Use a sharp size 7 or 8 hand-sewing needle and a stronger thread, like quilting cotton or button-and-craft thread, for the seams.
-
Can I cut my linen tote pieces a week ahead and sew later?
You can, but linen frays at the cut edge while sitting. Either zigzag or serge the edges right after cutting, or store the cut pieces flat in a sealed bag to slow shedding. Avoid stacking unfinished cut pieces loose in a project bin where they will rub against each other.
-
Is linen really stronger than cotton for a tote bag?
Yes for tear strength, no for everyday wear. Linen fibers are individually stronger than cotton, which is why the bag will hold heavy loads. But linen wrinkles harder, frays faster, and shows wear sooner at the seams. Both work; linen looks better with age, and cotton holds shape better day to day.
Why did you vote that way? Drop your take in the comments.