
Warm days and sunny skies mean it’s time for picnics! Instead of grabbing one off the shelf, why not put some personal touch on it? Why not design something that fits your style? Don’t worry about needing expert skills because sewing your perfect picnic blanket is something that is doable for anyone with sewing experience. Ready to give it a try? Let’s get into the steps! 🧵
DIY Picnic Blanket: A Simple Project That’s Worth the Effort
A DIY picnic blanket gives you something you can actually use. It becomes part of your routine, whether you’re in the backyard or at the park. This project is a simple way to create something useful from materials you probably already have. Let’s walk through the process from start to finish.
What You’ll Need 🧺
✅ Fabric for the top
✅ Waterproof backing
✅ Batting (optional)
✅ Bias tape or fabric strips
✅ Sewing machine
✅ Pins or clips
✅ Thread
✅ Scissors or rotary cutter
Step 1: Cut Your Fabric ✂️
Lay out your top fabric on a large, flat surface and measure your desired size. If you’re making a standard picnic blanket, 60” x 60” is a great size. However, feel free to adjust the dimensions.
Next, cut your waterproof backing fabric to match the top fabric. If you’re adding batting, cut it slightly smaller (about ½” less on all sides). This prevents unnecessary bulk when sewing the edges.
Pro Tip: If your fabric isn’t wide enough, sew two panels together. Just press the seam open to keep it flat.
Step 2: Layer and Pin 📌
Now, assemble the layers. Place the waterproof backing right side down on your work surface. Then, lay the top fabric right side up directly on top of it and evenly line up the edges. If you’re using batting, sandwich it between these two layers. Additionally, waterproof fabric can become slippery, so use plenty of clips or pins to hold it in place.
Step 3: Sew It All Together 🧵
Sew around the entire blanket and leave a 6-inch opening on one side. This gap will allow you to turn the blanket right side out later. Trim the corners at an angle to reduce bulk and help create crisp edges when you turn it. Carefully turn the blanket right side out and use your fingers or chopsticks to push out the corners.
Optional: If you want a more polished look, sew a topstitch around the entire blanket about ½ inch from the edge. This will also help keep the layers in place.
Step 4: Add Bias Tape for a Clean Finish (Optional) ✨
Open the bias tape and sandwich the raw edge of the blanket inside it. Pin or clip the tape in place to prevent shifting. Sew along the edge of the bias tape, ensuring you catch both sides in the stitch.
This step takes a little patience, but it gives your blanket a polished, store-bought look!
Step 5: Create a Roll-Up Strap for Easy Carrying 🎒
A picnic blanket is even better when it’s easy to carry! To add a simple roll-up strap, cut a 4” x 24” strip of fabric. Fold it in half lengthwise, sew along the long edge, and turn it right side out. Attach one end to the blanket’s edge and sew on a Velcro or snap closure. Now you can roll up your blanket and secure it neatly for on-the-go picnics! 🌿
Care Tips & Final Touches 🌿
Your DIY picnic blanket is now ready for outdoor adventures! To keep it in great shape:
- Spot clean or machine wash on a gentle cycle.
- Air dry to prevent heat damage to waterproof materials.
- Store rolled up with the strap to keep it compact and tidy.
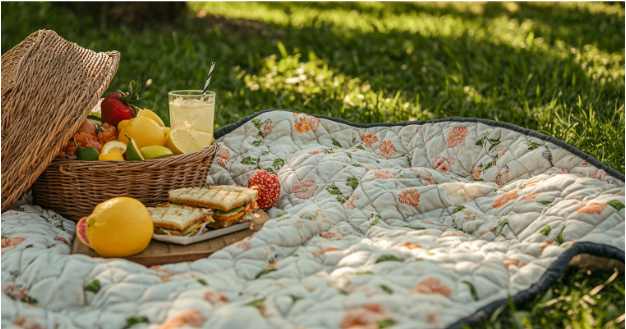
Now, all that’s left to do is pack your picnic basket, grab your favorite snacks, and head outside for some fresh air! ☀️
DIY Picnic Blanket : Time to Get Sewing!
This DIY picnic blanket is not just functional but also stylish and handmade with love. It’s perfect for sunny days, beach outings, and camping trips! Got a fabric stash waiting for a project? This is your sign! When you’re done, don’t forget to show off your masterpiece and tag your photos with #HandmadePicnicVibes!
Happy sewing! 🧵💛
FAQs About DIY Picnic Blanket
- Can I make this without a sewing machine?
Yes! Use fabric glue or iron-on hem tape for a no-sew version, though it won’t be as durable.
- What’s the best waterproof backing?
Ripstop nylon is lightweight and durable, while oilcloth is sturdy but heavier.
- Can I use fleece for the top fabric?
Absolutely! Fleece is cozy and water-resistant, but it may not lie as flat as cotton.
- How do I prevent shifting while sewing?
Use plenty of clips and a walking foot if your sewing machine has one.
- How big should I make my DIY picnic blanket?
A 60” x 60” blanket works for 2-4 people. For a large family, go up to 72” x 72” or more.
- Do I really need batting?
Nope! Batting just adds cushioning. Skip it if you want a thinner, lighter blanket.
- Can I use an old tablecloth as backing?
Yes! A vinyl or waterproof tablecloth works great as a budget-friendly option.
- How do I make the blanket wind-resistant?
Sew small loops into the corners and use stakes to secure it to the ground.
- What’s the best fabric for durability?
Canvas or outdoor fabric holds up best for frequent outdoor use.
- How long does this project take?
About 2-3 hours, depending on your sewing speed.