
The Essentials
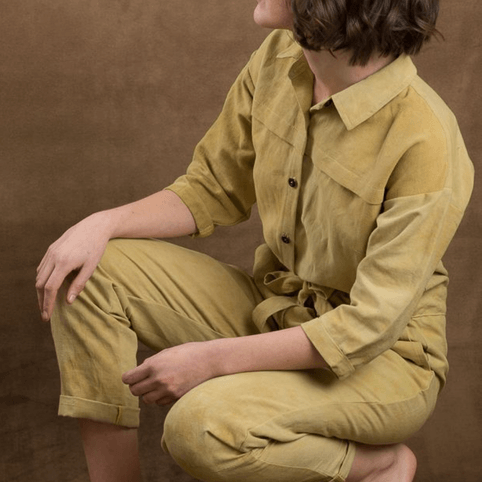
A coverall sewing pattern requires a three-pillar approach for success: a dedicated shorts-length muslin to lock in the crotch rise and torso length, heavy-duty 8 to 10 oz fabrics like twill or denim, and a specific use case (utility vs. fashion) defined before your first cut. The Closet Core Blanca Flight Suit is the trending coverall sewing pattern of the moment, but the same three pillars apply to every coverall on the market.
Related: Visible Mending Movement – Sashiko Mend
A coverall is one of the few garments where you cannot fix the fit at the hem. The crotch rise, the torso length, the shoulder slope, and the bust ease all have to be right at the muslin stage, or they’re wrong forever. That’s the seam-ripper moment most home sewists hit halfway through their first one-piece make. The good news: every fit problem on a coverall is solvable. You just have to solve it before you cut the fashion fabric.
Why is the Blanca Flight Suit the Trending Coverall Sewing Pattern Right Now?
Coveralls hit the intersection of three movements: a practical-fashion shift in women’s clothing, a sustainability conversation that favors made-to-last over fast-fashion replacement, and a sewing community that has gotten tired of ready-to-wear workwear that doesn’t fit anyone over a size 10.
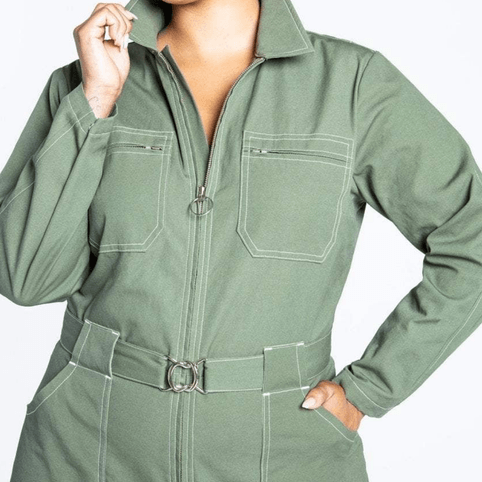
The Closet Core Blanca Flight Suit is the trending coverall sewing pattern this season, with active makers posting weekly on r/sewing and Instagram. It’s far from the only option. PatternReview’s master coverall thread lists more than 20 patterns: Merchant & Mills Thelma, Style Arc Melrose, Ready to Sew Jean-Paul, Alice & Co. Intrepid, the free Rational Dress Society Jumpsuit, and several Big Four options. The pattern landscape is wide. The fit challenges are universal.
“I’ve dreamed of sewing a boilersuit for myself and was never sure I would have the skills to do so.” Closet Core reviews
How Do You Fit and Modify a Coverall for Your Body Type?
A coverall is a muslin or cry garment. It has more independent fit zones (bust, shoulder slope, torso length, crotch rise, hip) than any other garment a home sewist tackles. Treat the muslin as mandatory, not optional.
- Before You Start
Skill prerequisite: You’ve made fitted pants you’re happy with, and you can tell the difference between a wedgie drag line (vertical pull) and a smile line (diagonal pull at the crotch). Time: Allow 2 to 3 hours for muslin construction and fitting before cutting fashion fabric. Tools: Cheap cotton sheeting, contrasting basting thread, fabric pen, ruler. - Pick your size in three numbers, not one.
Measure high bust (around the chest, above the bust apex), full bust (across the apex), and hip-to-waist differential. Choose your bodice size by high bust. Choose your pant size by hip. Grade between them at the waistband. If your pattern offers two cup-range options, like Closet Core’s 0–20 (dartless) and 14–30 (with bust dart), pick the curvy range whenever you fall into both, because the bust shaping is already drafted in. - Curve-Inclusive Sizing Note:
If you have a B-cup or larger, or a hip-to-waist differential over 10 inches, the standard size chart will not fit you straight from the envelope. Plan your full bust adjustment or hip grading before you cut the muslin, not after. The Cashmerette Cup Size Contour Method is the most reliable approach for B-cup and above. (See our full bust adjustment guide for fitted bodices for the step-by-step method.)
The four-step fit check below uses a shorts-length, sleeveless muslin in cheap cotton sheeting.
-
Pin the toile, stand, sit, reach, squat.
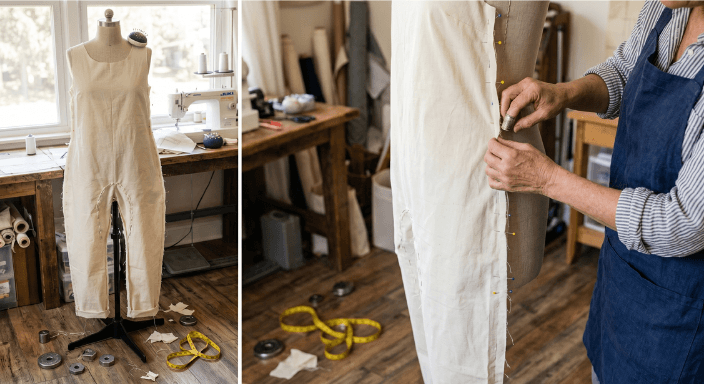
Baste the side seams and crotch. Pin the center front closed. Stand in front of a mirror, then sit cross-legged on the floor, then reach both hands overhead, then squat. Each position reveals a different fit problem. Don’t try to “see how it photographs.” Photograph poses hide every fit issue a coverall has.
-
Mark the shoulder seam if it falls past your shoulder point.
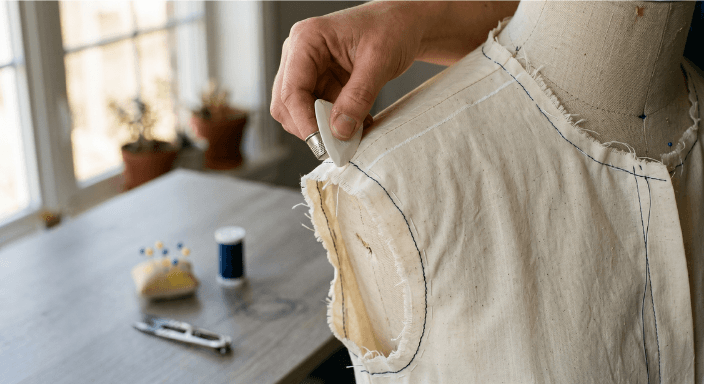
Stand against a wall. Have a friend (or a mirror and a fabric pen) mark where your actual shoulder ends. The Blanca and most coverall patterns use a dropped shoulder. On narrow shoulders, that drop reads as a cap sleeve. One reviewer noted that “the shoulders look wide on many people.” Take a wedge out of the front and back shoulder seams, tapering to nothing at the neckline.
-
Check the side seam against a ruler.
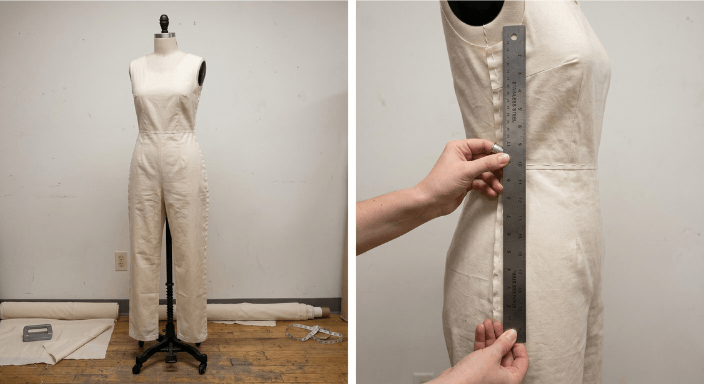
Side seams should hang perpendicular to the floor. If they swing forward, your back length is too short. If they swing backward, your front length is too short. This is the single most reliable diagnostic for torso length on a one-piece garment.
-
Mark the torso length adjustments with contrasting thread.
If the muslin gives you a wedgie or pulls drag lines from the crotch to the shoulder, you need more torso length. If it sags low between the legs, you need less. Mark the adjustment line in red basting thread, take the muslin off, and transfer the change to the pattern paper before you cut anything else.
“I made a ‘wearable muslin’ for this project, which in the end doesn’t fit me well enough for me to feel comfortable wearing.” Buried Diamond blog
The lesson in that quote: a wearable muslin in fashion fabric is the most expensive way to learn what a sheet muslin would have told you for $4.
What Fabric Weight is Best for a Durable, Comfortable Coverall?
Fabric is where most first-time coverall makes go wrong. The pattern envelope shows a drapey, beautiful version. Your real life shows you crouching in the garden, kneeling on a workshop floor, or reaching into the back seat of a car. Workwear stress-tests every seam.
- For a utility coverall (garage, garden, studio, or weekly wear), use 8 to 10 oz cotton twill, washed denim, or canvas. These weights hold their shape, take topstitching cleanly, and survive repeated washing.
- For a dressed-up boiler suit (coffee shop, dinner, occasional wear), a mid-weight linen blend (6 to 8 oz) or a stable Tencel-cotton blend works. Expect more wrinkling and less abrasion resistance.
- What not to use: rayon, lightweight Tencel, lightweight linen, or any drapey woven under 5 oz. They look photogenic flat on the cutting table and bag at the knees and rear within five wears. One reviewer who worked with Tencel wrote that she “basted every single seam by hand before sewing it on the machine, and I spread the making of it over many, many days.” That’s the level of effort a slippery fabric demands. It’s not a beginner combination.
- Pre-wash everything. Cotton and linen shrink 3 to 5 percent in the first wash. A coverall that fits before pre-wash will not fit after. Wash and dry your fabric the way you’ll wash and dry the finished garment, twice if it’s denim or heavy twill, before you cut a single piece.
This article contains affiliate links. We earn a small commission on qualifying purchases at no extra cost to you. We only link to fabrics and tools we’ve sewn with ourselves.
What are the Most Common Closet Core Blanca Modifications?
Five modifications appear repeatedly in Blanca community reviews. If you’re sewing this coverall sewing pattern, plan for these before you cut.
- Narrow the dropped shoulder (1/2 to 1 inch wedge from front and back shoulder).
- Shorten the bodice (1 to 2 cm, both front and back, to prevent collapsing at the center back).
- Adjust the rise (increase back rise, decrease front rise; common for short-waisted sewists).
- Add elastic to the back waistband (Closet Core suggests this in the booklet; many makers add it as a default).
- Slim or cuff the leg (the trousers run wide and long for taller drafts).
Before You Start
Skill prerequisite: You’re comfortable with a pant front-and-back rise adjustment from a previous trouser project. Review our pants fitting fundamentals tutorial if rise adjustments are new to you. Time: Allow 1 to 2 hours per modification, including muslin re-test.
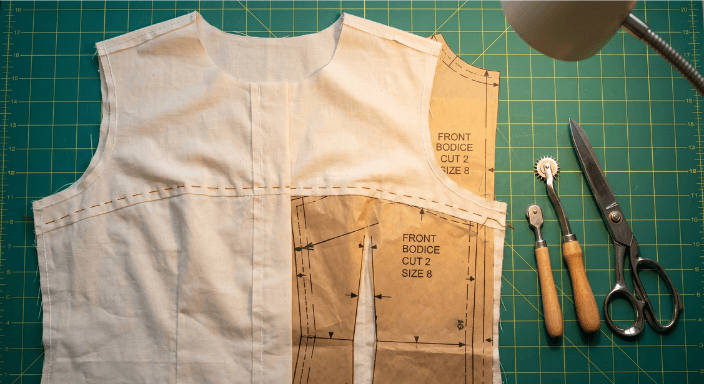
1. Mark the modification on the paper pattern in colored pen before cutting. Trace your size first, then mark the adjustment over the trace. Never cut directly into a multi-size pattern; preserve the original.
2. Transfer the modification to the muslin in a contrasting thread. Sew the muslin first with the adjustment included. Don’t trust the paper math until you’ve seen it on a body.
3. Re-test the muslin after the modification before transferring to fashion fabric. Sit, squat, reach, walk. If the modification produces a new fit problem (and it often does), solve it now. Cutting fashion fabric is the last step, not the first.
“I’m just very short-waisted, especially in the front, and after my Marigold and Anza/Marigold jumpsuit experiments last year, I knew if I wanted a good fit, I’d have to work for it.” Lindsay Janeane
Can You Sew a Heavy-Duty Coverall on a Basic Home Machine?
Yes. You’ll need a jeans needle (90/14 for twill, 100/16 for denim), heavier thread for topstitching (Gutermann jeans thread or Mara 70), and ideally a walking foot for sewing through multiple layers of heavy fabric. A denim presser foot helps when crossing thick topstitched seams.
Pressing tools matter more than the machine. A tailor’s ham shapes the crotch curve. A clapper sets sharp topstitching on collars and cuffs. Spend $30 on pressing tools before you spend it on a fancier presser foot.
Before You Start
Skill prerequisite: You’re confident with topstitching, lapped or exposed zippers, and at least one of flat-fell or French seams. All three skills appear repeatedly on a coverall, so practice them on a small project (like a tote bag) before tackling the boiler suit.
What’s Your Next Step on This Coverall?
Choosing the right coverall sewing pattern is just the start; the magic happens in the muslin and the fabric choice. Pick the pattern. Measure in three numbers. Cut the muslin into short lengths. Sit on the floor in it. Adjust before fabric. Define the use case in one sentence and let it pick your fabric.
Check out this video from Sew Happy.
Frequently Asked Questions
-
How do you draft a coverall pattern from scratch?
You combine a fitted bodice block with a trouser block at the waist, adding ease for movement at the crotch and shoulder. Self-drafting requires intermediate flat-pattern skills and a tested set of personal blocks. For most home sewists, a $25 to $35 published coverall sewing pattern is a faster, cheaper path to a wearable result.
-
What fabric is best for utility coveralls?
Use 8 to 10 oz cotton twill, washed denim, or canvas to ensure the garment survives repeated workshop or garden use. Lightweight linens, rayons, and Tencels under 5 oz will bag at the knees and rear within a handful of wears. Pre-wash all fabric before cutting.
-
How do you fit coveralls for your body type?
Measure high bust, full bust, and hip-to-waist differential. Pick the bodice size by high bust and the pant size by hip. Grade between them at the waistband. Make a shorts-length sleeveless muslin in cheap cotton and adjust the shoulder, torso length, and crotch rise before cutting fashion fabric.
-
Can you sew coveralls with a basic home sewing machine?
Yes. Use a jeans needle (90/14 or 100/16), heavier topstitching thread, and a walking foot if you have one. Most modern home machines handle 8 to 10 oz twill without issue. Denim and canvas may need slow stitching at thick seam intersections.
-
What sizing adjustments do you make for coverall patterns?
The five most common adjustments on the trending Blanca pattern are: narrow the dropped shoulder, shorten the bodice, adjust the front and back rise, add waistband elastic, and slim the leg. Plan all of these in the muslin stage, not the fashion fabric stage.
-
Do I really need to make a muslin for a coverall?
Yes. A coverall has more independent fit zones than any other garment, and a $4 sheet muslin prevents a $50 to $80 fabric mistake. Skip the muslin only if you’ve already made the same coverall pattern before and you have notes from the previous make.
-
How long does it take to sew a coverall?
Expect a realistic timeline of two to three weekends (approximately 10 to 12 hours), including fitting and construction. Closet Core rates the Blanca as advanced, requiring 8 or more hours of construction alone. Add muslin time (2 to 3 hours), fitting adjustments, and pressing throughout.
Why did you vote that way? Drop your take in the comments.


