Snapshot of French Seams Sewing
A French seam is a two-pass enclosed seam that hides raw edges inside the seam itself, with no serger required. It is the right finish for sheer, fray-prone, or unlined woven garments. Sew the first pass with wrong sides together at 3/8″, trim to 1/8″, press, then fold right sides together and sew at 1/4″. Always confirm your pattern’s seam allowance first.
Related: Lightweight Fabrics for Beginners: Sew Summer Garments Without the Struggle
What Is a French Seam, and Why Does It Lie Differently?
A French seam is sewn twice. The first pass joins your fabric with the wrong sides together, which is the opposite of every other seam you have ever sewn. The second pass folds the fabric right sides together and stitches again, so the raw edges from the first pass end up sealed inside the finished seam.
That backwards first step is why French seams sewing trips people up. As one sewist put it: “I really like French seams, but they tend to trip me up. Sewing wrong sides together is so counterintuitive!”– Melly Sews
The payoff is real: a clean enclosed seam, no fraying inside the garment, no serger required, and a finish that holds up to repeated washing.
When Should You Use a French Seam? (And When Should You Skip It?)
This is where most tutorials lie to you. French seams are not the right answer for every project.
Use a French seam when:
- Your fabric is sheer (chiffon, organza, voile, silk), and any other seam finish would show through.
- Your fabric frays heavily (rayon challis, lightweight linen, lightweight cotton).
- Your garment is unlined, and the inside will be visible or touch skin (camisoles, blouses, kids’ pajamas, pillowcases).
Skip the French seam when:
- Your fabric is denim, canvas, fleece, or heavy wool. Four layers of bulk will twist and stiffen the seam.
- Your fabric is a knit. French seams are for woven fabrics only.
- Your garment is lined, and the inside seams will never be seen.
The honest version: some sewists French seam every project because the inside of a garment matters to them. Others reserve the French seam for fabrics that genuinely demand it and use a clean serged seam everywhere else, saving an hour per project. Both positions are defensible. The fabric in your hands makes the call, not the tutorial.
One PatternReview.com sewist sums it up: “French seams are for silk charmeuse, voile, chiffon, lawn. If your fabric is heavier, use different seams.” -PatternReview.com.
How Do You Calculate the Seam Allowance So Your Garment Doesn’t Run Small?
This is the step nobody tells you about, and it is the reason garments sewn with French seams come out tight.
A French seam uses the entire seam allowance of your pattern across both passes combined. If you ignore the math, you eat into the body of the garment and lose fit.
- For a 5/8″ pattern allowance: sew the first pass at 3/8″, trim, fold, sew the second pass at 1/4″. Total used: 5/8″. Fit holds.
- For a 1/2″ pattern allowance: sew first pass at 1/4″, trim, fold, sew second pass at 1/4″. Total used: 1/2″.
- For a 3/8″ pattern allowance (common in indie patterns), you must add at least 1/4″ to the pattern before cutting. Otherwise, French seams will not work on this pattern.
A reader at In the Folds learned this the hard way: “I once made a top that came out too tight because of the French Seams!!” – In the Folds reader question.
Do the math before you cut.
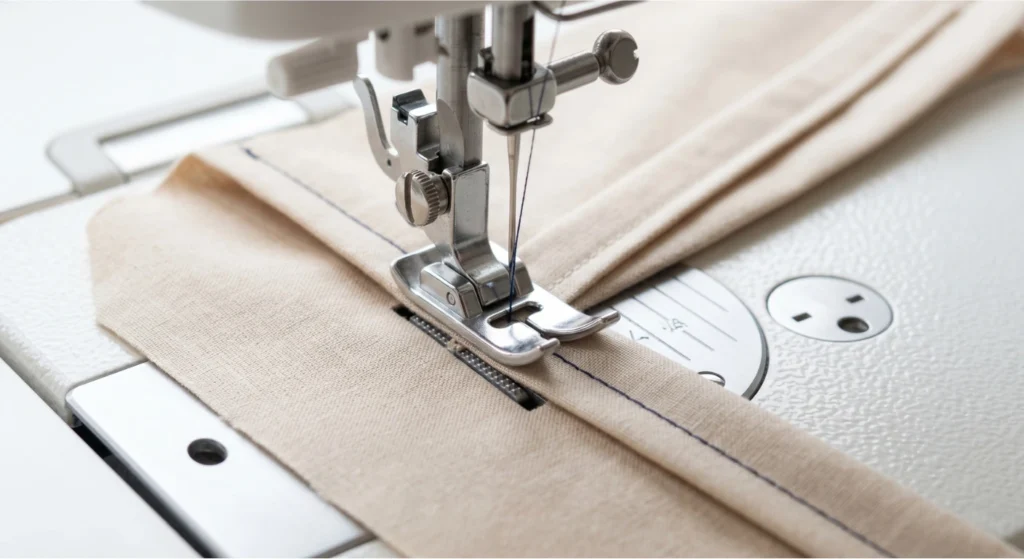
How Do You Sew a French Seam, Step by Step?
Step 1: Test on a scrap of your project fabric.
Cut two strips of the actual fabric you’ll use for the garment. Run the full French seam on the scrap before cutting your pattern pieces. Watch for puckering, tension issues, or fraying. Install a fresh size 60/8 or 70/10 universal needle for lightweights, re-thread the top and bobbin, and lower top tension by half-increments if the scrap puckers. Most “ruined” French seams are tension or needle problems caught one inch into the real fabric. Catch them on the scrap.

Step 2: Pin pieces with WRONG sides together.
This is the counterintuitive step. The “outside” of your fabric faces outward as you pin. Align the cut edges precisely and pin along the seam line. If your fabric is slippery (silk, chiffon), pin every inch. For stable cottons and linens, every two inches is fine.
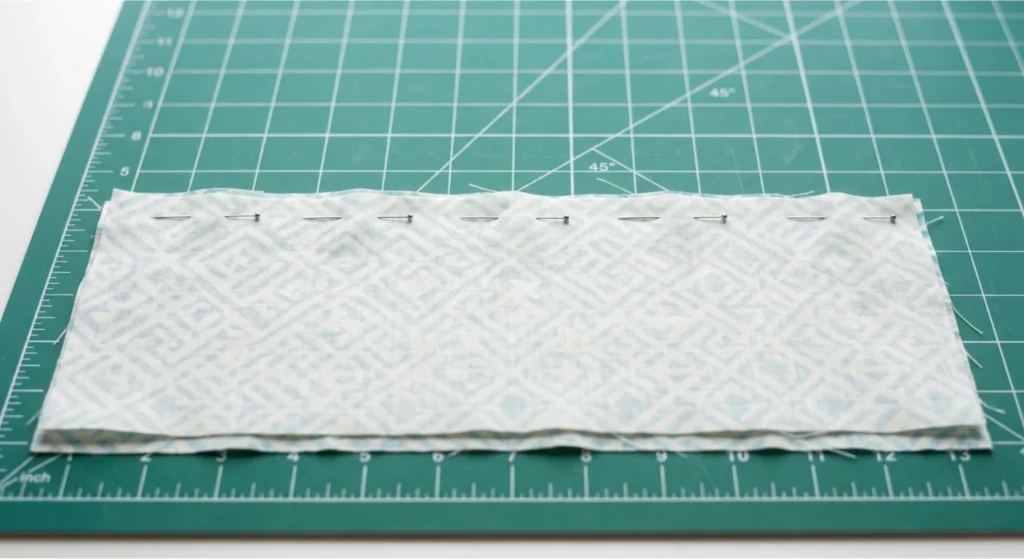
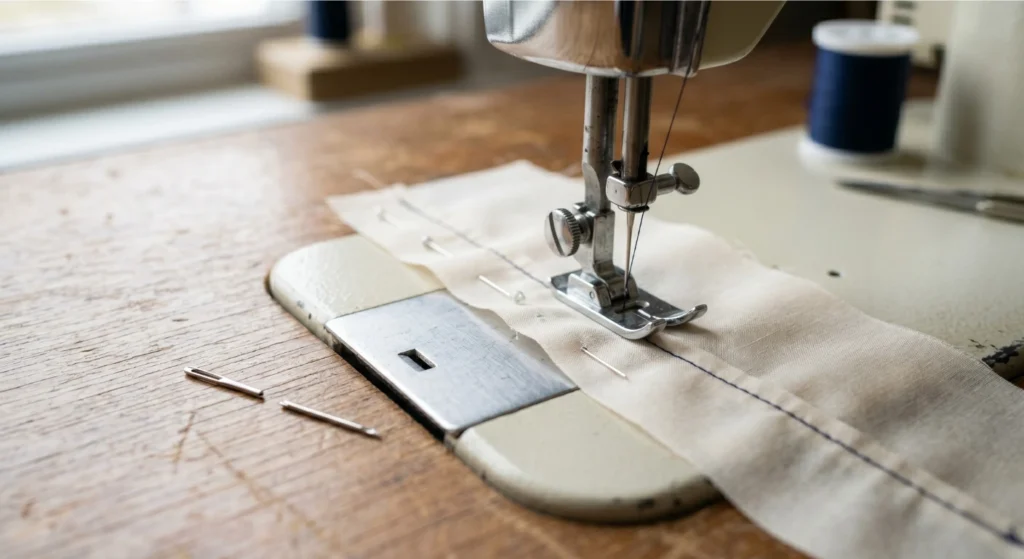
Step 3: Begin your French seams sewing with the first pass at 3/8″.
Use a straight stitch. Backstitch at the start and end of the seam to lock the threads. Sew slowly enough that the fabric feeds evenly without dragging. Do not skip the pattern math step above.
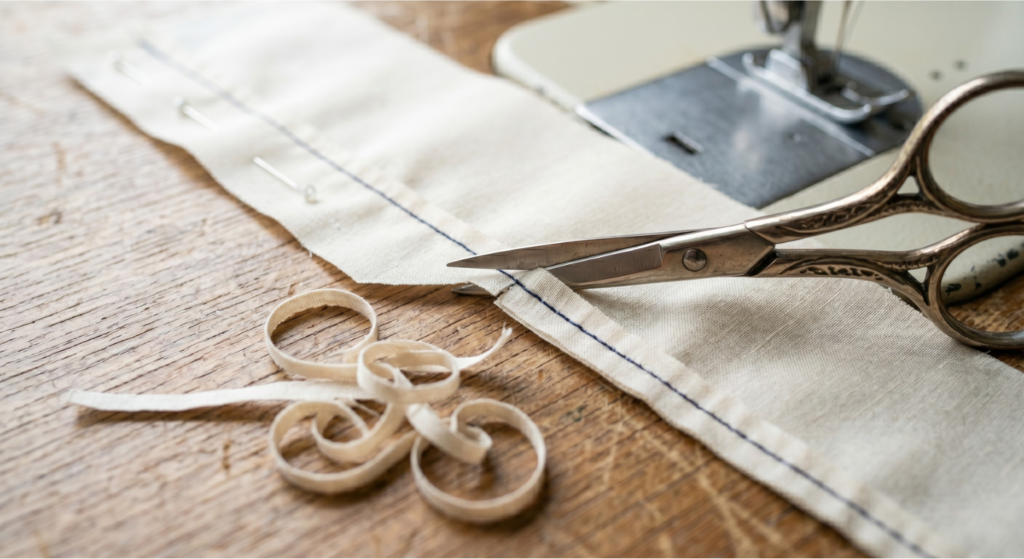
Step 4: Trim the seam allowance to 1/8″.
Use sharp scissors. Trim cleanly and minimize how much you handle the cut edge. Overhandling causes fresh fraying that pokes through the finished seam later. As one tutorial warns: “It is important to sew the second line of stitches accurately, or you will get little tufts of raw edges poking through the seam.”
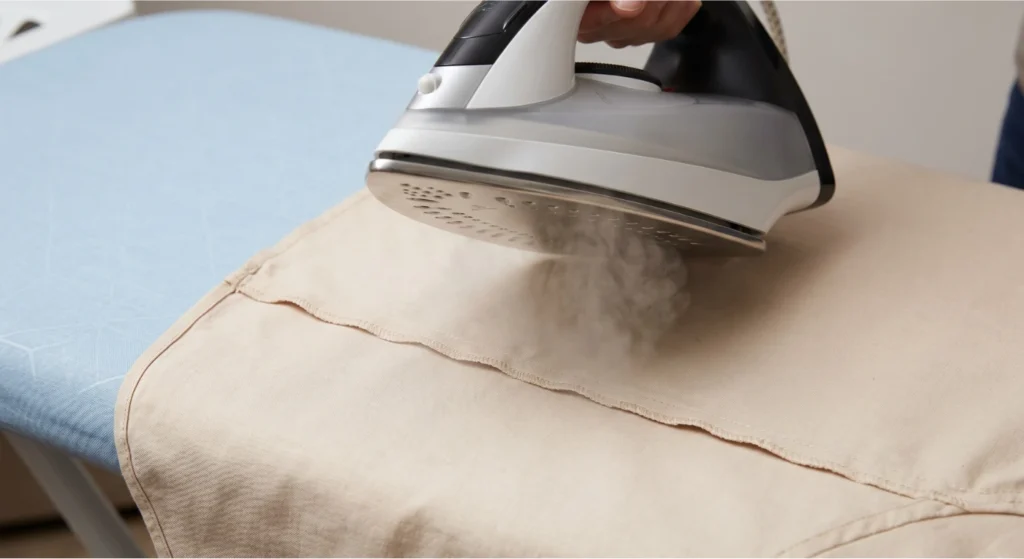
Step 5: Press the seam flat, then press it open.
Use an up-and-down pressing motion, not a sliding motion. Pressing is construction, not finishing. It determines whether the second pass lies flat or twists. Press the seam allowance flat first, then press it open so the trimmed edges sit cleanly.
Step 6: Fold and sew the final 1/4″ pass right sides together.
The trimmed raw edges are now sandwiched inside the fold. Pin along the new seam line, making sure the fold sits exactly on the edge. Stitch at 1/4″ from the folded edge. The previously cut raw edges are now enclosed inside the seam. Press the finished seam to one side, usually toward the back of the garment.
How Do You French Seam a Curve or a Closed Sleeve?
A French seam wants a straight line. Curves want to ease. The two are at war, but workable.
- For gentle curves, trim closer than usual (1/16″ instead of 1/8″) and sew in 2-inch sections, pressing each section over a tailor’s ham before moving on. Closet Core Patterns recommends: “Be sure to use your iron, a tailor’s ham, and lots of steam to help control the fabric.” Closet Core Patterns
- For sharp curves, switch finishes. Hong Kong binding or a bias-bound seam handles a tight princess seam better than a French seam ever will.
- For closed sleeves, sew the underarm seam wrong sides together as your first pass while the sleeve is still flat. Trim. Press. Then push the sleeve through itself to expose the seam, fold, and sew the second pass at 1/4″.
This is the moment every sewist describes the same way: “Once I stitch the sleeve seam (first pass), how am I supposed to get the closed sleeve stitched the second time? It’s no longer open.” – PatternReview.com. You’re not doing it wrong. It is genuinely fiddly. Push, fold, sew.
What Goes Wrong with French Seams (And How to Fix It)?
The seam doesn’t stay pressed after washing. As one sewist asked: “The first time you wash it, it’s as if you never pressed the seam at all.” – PatternReview.com. Press the finished seam firmly to one side with steam, and topstitch close to the seam line if you need it to stay anchored permanently.
- Raw edges poking through the finished seam. Your first pass was not trimmed close enough, or the cut edge was overhandled. Trim to 1/8″, handle minimally, and if the fabric is extreme-fray, sew the second pass at 5/16″ instead of 1/4″ to catch stragglers.
- Puckering. Almost always tension or needle, not technique. Drop top tension by half-increments and install a fresh 60/8 or 70/10 needle. Re-thread from scratch.
- Lumpy or twisted seam. You skipped a pressing step or pressed in the wrong direction. Press the first pass open before turning. Press the finished seam to one side.
- Garment too tight. You skipped the seam allowance math. There is no recovery on already-cut fabric. Recut.
French Seams Sewing as a Decision, Not a Default
French seams sewing is a finish that earns its time on the right fabric and wastes your time on the wrong one. The skill is not just the two-pass procedure. It is knowing when to reach for it. Sheers and fray-prone wovens, yes. Denim and fleece, no. Closed sleeves on a chiffon blouse, yes, and yes, it will be fiddly. Match the finish to the fabric, do the seam allowance math before you cut, and the inside of your garment will look as deliberate as the outside.
Try the French Seam on Your Next Lightweight Project
Download the field card. Pick a pillowcase, a simple woven blouse, or a pair of cotton pajama pants for your first attempt. Save the silk chiffon for project number three.
How to Sew: French Seams | Step-by-Step Sewing Tutorial | Neat Seam for Lightweight Fabrics from Rokolee DIY
Frequently Asked Questions
-
Can you sew French seams on a regular sewing machine without a serger?
Yes. French seams are specifically designed for sewists without a serger. That is one of the main reasons the technique exists. You only need a straight stitch, a sharp needle, and a working iron. The two-pass construction encloses the raw edges inside the seam itself, so no overlock stitch is required.
-
What seam allowance do I need for a French seam?
A 5/8″ pattern allowance is the standard target. Sew the first pass at 3/8″ and the second at 1/4″. For a 1/2″ allowance, sew both passes at 1/4″. For a 3/8″ allowance, you must add at least 1/4″ to your pattern before cutting, or the technique will not work without eating into the garment fit.
-
What fabrics work best for sewing French seams?
Lightweight to medium-weight wovens that fray easily. Best results: silk chiffon, organza, voile, batiste, lawn, lightweight cotton, rayon challis, and lightweight linen. Avoid denim, canvas, fleece, heavy wool, and any knit fabric. The 4-layer construction creates too much bulk on heavy weaves and does not stretch with knit fabrics.
-
Why are my French seams puckering?
Puckering is almost always a tension or needle problem, not a technique problem. Drop your top tension by half-increments and install a fresh size 60/8 or 70/10 universal needle for lightweight fabrics. Re-thread the top and bobbin from scratch. Test the corrected setup on a scrap of the actual project fabric before sewing the garment piece.
-
Why do raw edges still show through my finished French seam?
Two causes. The first pass was not trimmed close enough. Trim to 1/8″ with sharp scissors. Or the cut edge was overhandled and re-frayed. Handle the trimmed edge as little as possible before the second pass. If the fabric is extreme-fray, sew the second pass at 5/16″ to catch any stragglers that escaped the trim.
-
Can you French seam an armhole, set-in sleeve, or other curved seam?
Yes, with caveats. For gentle curves, trim to 1/16″ instead of 1/8″ and sew in short sections, pressing each section over a tailor’s ham. For sharp curves or set-in sleeves, French seams become difficult. Many sewists switch to Hong Kong binding or a bias-bound seam instead. French seams shine on straight side seams and inseams.
-
How is a French seam different from a flat-felled seam?
Both enclose raw edges. A French seam is sewn from the inside and shows as a single line of stitching from the right side, with the enclosed seam invisible. A flat-felled seam is topstitched down on the right side, leaving two visible parallel lines (think jeans inseams). French seams suit delicate fabrics. Flat-felled seams suit heavier, high-stress garments.
-
How do you sew a French seam on a sleeve that is already a closed tube?
Sew the underarm seam wrong sides together as your first pass while the sleeve is still flat. Trim, press the seam open, then push the sleeve through itself to expose the first seam from the right-sides-together orientation. Sew the second pass at 1/4″. Push the sleeve back through. Yes, it is fiddly. Every sewist hits this moment.