
Revamping old clothes is one of the wardrobe lifehacks that students learn over time. Now that school has started, upcycling some of your old clothes is the solution to stay trendy. For sure, you worry about what to wear not only on the first day of school but practically almost every day. So to help you out, I have here a DIY T-shirt dress. It is simple, casual, and chic. I think it is the perfect back to school outfit because it is comfy and laid back. Check out this DIY clothing tutorial and see what I mean.
Make Your Own T-Shirt Dress For School | DIY Clothing Tutorial
Laidback and Casual Back to School Look
Looking great on the first day of school is a big deal for us girl! But then, to look great every day comes at a price especially if you don't know any stylish wardrobe lifehacks. If you want to look stunning without breaking the bank, then it's time to learn how to upcycle your clothes. Indeed, DIY clothing is an ingenious way of refashioning your wardrobe!
With this DIY clothing tutorial, you can come up with a stylish t-shirt dress. There's no need to shop for new clothes every week. What's more, you can stand out from the crowd with your very own creation. How cool is that?
So without further ado, let's begin this tutorial.
What you need:
sewing machine
twin needle
pins
jersey fabric
pins
scissors
Ready? Get set…sew!
1. The template
Copy this measurement and make a real life template. Next, adjust the measurements according to your body size. If you are unsure how to do this, use this guide.
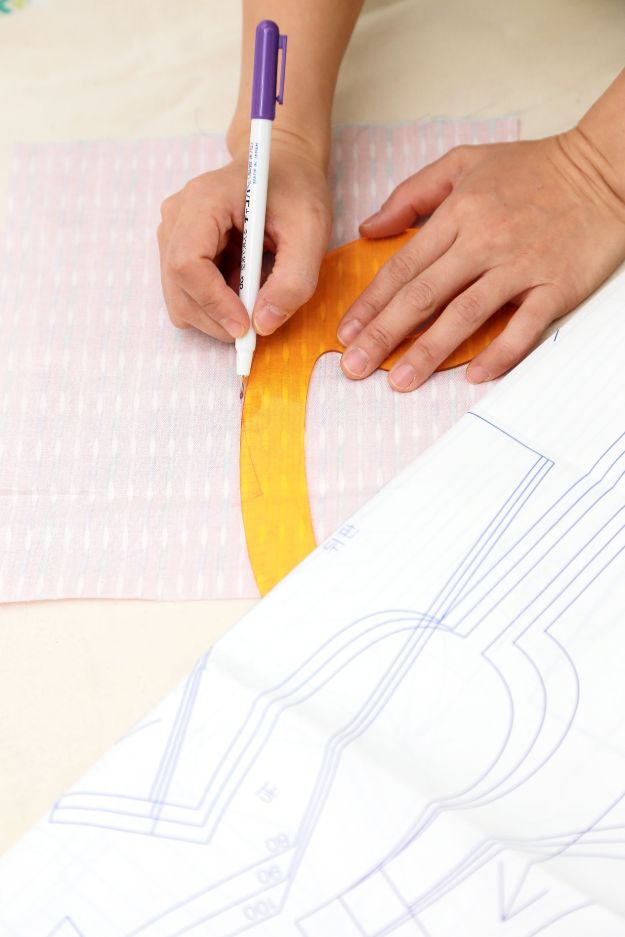
2. Cutting of the fabric

After drawing the pattern on a sheet of paper, pin it to the fabric. Make sure everything is flat before cutting it. If you don't have a rotary cutter, use a scissor.
3. Sleeve mark
Find out where the sleeve mark is and clip it. Afterwards, cut a small slit in the area.
4. Sew them together
Sew shoulder and side seams together. Then sew the sleeves individually before you attach them to the dress.
5. Hemming
Now you will need to hem the sleeve and bottom of the dress. Use a twin needle for this unique stitching.
6. Finishing touches
You can redraw the neckline if you want it to be lower and more revealing. After all, if you have them, flaunt them! Then, measure the new neckline length. Afterwards, attach binding to the neckline. Then fold the binding and serge the end and understitch the neckline.
And you're all done!
This is how the finished t-shirt dress is going to turn out. This is a fun and comfortable dress for a casual day out or for first day high!
Check out this t-shirt dress tutorial by MYSTYLEDIARYY:

You can actually glam up this basic t-shirt dress by adding more details. For example, some people like pockets and slits. Or you can also add buttons and laces and embroideries. Just do your own thing. This t-shirt dress is your canvas.
Do you prefer a long sleeve t-shirt dress? Get this ROMWE Women's Long Sleeve Loose Casual Tunic T-Shirt Dress from Amazon.
Looking for more upcycling projects? Head your way here.