
Straight stitches are one of the easiest and most basic sewing techniques every sewer has to learn. Start mastering this skill in five clever steps!
Learn How to Straight Stitch in 5 Easy Steps
Before you go on to assemble fluffy ball gowns or even create your own pants from scratch, you have to learn the foundation of all stitches: the straight stitch. Once you’ve mastered this stitch, a whole new world of endless possibilities is within your reach. With this stitch in your arsenal of skills, you’ll be sewing skirts and dresses of different fabrics in no time! Read on to learn the five easy-peasy steps to mastering the straight stitch.
Materials You'll Need to Sew a Straight Stitch
- Sewing Machine and Thread
- Fabric
- Scissors
Step 1. Set Up Your Machine
After threading your sewing machine, pull on the two threads so they're pointing towards the back. If your machine comes with various stitch options, set it in the straight stitch option.
You might also want to adjust the length of your machine depending on how you long or dense your stitches should come out. For this tutorial, we set the stitch length to medium length of 2.5-3.5. The smaller the number your stitch length, the shorter the stitches. If you need a denser amount of stitches, you might want to set your machine to one. If you need longer stitches, set it to five.
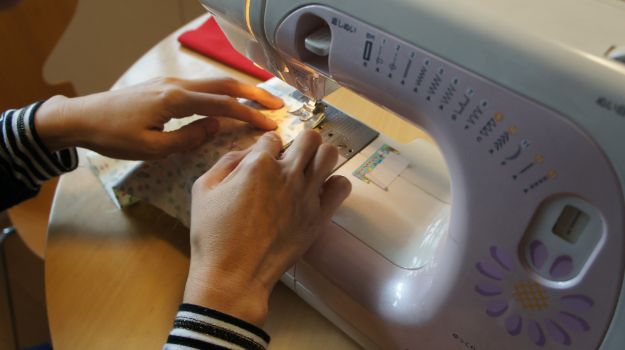
Step 2. Place the Fabric Underneath the Pressure Foot
Use the lever on the right-hand side to lower the pressure foot down. The pressure foot keeps your fabric in place while your machine runs through your fabric.
Step 3. Push on the Foot Pedal
Lightly press on the foot pedal, propelling your fabric forward underneath the needle. While the needle runs, keep the edge of your fabric in line with the edge of the presser pedal.
Step 4. Go Forward-Backward
Press the reverse button on the side of your machine to bring your fabric backward. Keep this forward and backward stitching until you reach the end of your fabric that needs stitching. With this forward-backward stitching, your stitches are sealed better and less likely unravel.
Step 5. Finish Sewing
Once you've reached the end of your fabric that needed straight stitching, you may keep your foot off the pedal and stop your machine. Snip off the loose thread and voila! You've now successfully made a straight stitch!
For a more detailed tutorial, watch this video from withwendy:

Isn’t that easy? Learning how to straight stitch is definitely one the easiest things to learn in sewing. When you’ve mastered this stitch after this tutorial, you can do various sewing projects or even other basic DIY projects.
Do you have tips and tricks in learning how to sew straight stitches? Let us know in the comments below!
Learn other basic sewing techniques! Check out the 25 Basic Sewing Skills Every Beginner Must Learn!
Follow us on Facebook, Twitter, Instagram, and Pinterest!
Editor’s Note – This post was originally published on July 2016 and has since been updated for quality and relevancy.