![Hand Embroidery Stitches Every Sewer Should Know [INFOGRAPHIC] | Featured](https://sewing.com/wp-content/uploads/2020/01/Feature-Image-Sewing.com-Hand-Embroidery-Stitches-Every-Sewer-Should-Know.jpg)
How many hand embroidery stitches do you know? With patience and practice, you'll get the hang of this special sewing skill in no time!
RELATED: Embroidery 101 | Easy Hand Embroidery Tutorial For Beginners
[sc name=”aff_link_1″]
17 Different Types of Hand Embroidery Stitches
Click here to jump to the infographic.
Basic Embroidery Stitches
Learning all the different hand embroidery stitches is not as difficult as you think. Embroidery is a handicraft that uses yarn and needle to create a beautiful design pattern.
You can certainly create and have fun at the same time by simply creating your own embroidery pattern.
But before you can make different hand embroidery designs, you need to learn these types of stitches in embroidery we're about to share! Enhancing your skills on embroidery stitches is one way of producing an embroidery masterpiece.
Learning all the embroidery stitches can be challenging and daunting. But let me tell you this: embroidery is super easy!
Just think of it this way — it's just coloring with thread! Keep reading as we share 17 types of hand embroidery stitches we can't live without.
[sc name=”aff_link_2″]
1. Running Stitch
The running stitch is mostly used to create an outline of an embroidery design.
This kind of stitch is used for sewing almost anything from clothing to embroidery. Also known as straight stitch, the running stitch is the easiest to learn.
2. Back Stitch
The backstitch is a thin-line stitch commonly used in outlining a design before filling with a satin stitch and a base of many composite stitches. It is also used if you want to add fine detail to your embroidery work design.
[sc name=”aff_link_3″]
3. Split Stitch
The split stitch is a basic embroidery stitch often used for delicate lines and curves. It looks like a mini-chain stitch when done continuously.
It's great to use in outlining designs like floral stems.
4. Stem Stitch
Do you have a project that involves embroidering flower stems?
The stem stitch will get the job done — it's beginner-friendly and known to be one of the easiest to do. Often used in creating an outline of most embroidery stitches, it's ideal to use for curved or straight lines.
[sc name=”aff_link_4″]
5. Satin Stitch
Want to add texture to your design? The Satin stitch is basically an easy stitch used in covering certain designs (like a leaf) which leaves a smooth, satin-like appearance.
Some embroiderers create an outline of the design first using straight stitches to make sure the satin stitches naturally lie within its parameters.
6. French Knot Stitch
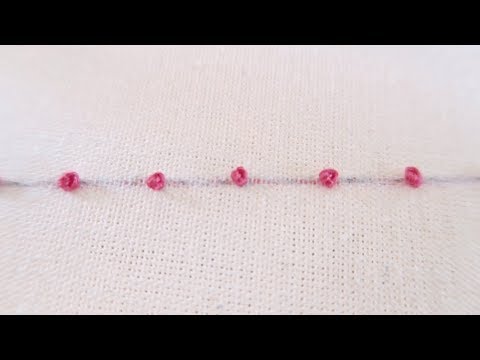
This knot or stitch is usually used in creating fine details, such as eyes, in a design pattern. Although not commonly used, you can embroider the French knot stitch to fill the center of flowers or round shape designs.
7. Chain Stitch

This stitch is one of the most basic embroidery techniques that form a chain-like pattern after a series of looped stitches. The chain stitch is particularly used for straight or curved lines.
8. Lazy Daisy Stitch

The lazy daisy stitch is a type of stitch that is frequently used for making the floral and petal designs of most embroidery patterns.
It is not made continuously. Instead, you have to make a loop and create a small stitch at the end of the loop, which later on turns into the image of a daisy petal.
RELATED: 20 Free Embroidery Patterns You Can Recreate For Every Occasion
[sc name=”aff_link_5″]
9. Feather Stitch

The feather stitch is also known as a single coral stitch. You'll love it once you've learned how to do it because of how attractive and easy it is to do.
10. Seed Stitch

The seed stitch is also considered a running stitch. Some embroiderers also call this a rice grain stitch.
It is basically done by making a running stitch in one single direction until it fills the whole design just like the image shown above.
11. Herringbone Stitch

Herringbone stitch is a versatile stitch used to hem garments. It is also known as the catch stitch or plaited stitch. If you'll try to recreate this, you might want to draw parallel lines to make sure you're getting even spaces in between.


- Used Book in Good Condition
- English (Publication Language)
- 56 Pages - 01/01/2006 (Publication Date) - Kalmbach Pub Co (Publisher)
12. Detached Chain Stitch

To come up with the perfect lazy daisy flower embroidery design, you must know how to perform one of the basic embroidery stitches, which is the detached chain stitch.
Also known as a single chain stitch, this stitch is perfect for making flowers and leaves. It is usually sewn similarly to a standard chain stitch but only with just one “link.”
[sc name=”aff_link_6″]
13. Fly Stitch

When making a fly stitch, your results should look very much similar to a flying bird when seen from afar. Measure its distances and create numerous stitches, like this, in a row to resemble a flock of flying birds in your embroidery piece.
It is usually made just like how you make a detached chain stitch, but instead of creating a petal of a flower or a leaf, you make it into a V shape or a soft curve instead.


14. Woven Wheel Stitch

Referred to as a single stitch, the woven wheel stitch makes one of the most amazing embroidery techniques, which is the rose-like stitch. Thus, it is also known as the woven rose stitch.
It's an easy-to-learn embroidery stitch design that may look complicated because of its numerous stitches all bundled in a circle to form a slightly-bloomed rose flower.
Just start with a star of straight stitches, then work through with your thread to form a flower. You'll have your roses lined up in your tapestry in no time!
15. Couching Stitch

This stitch uses two strands of thread at the same time. One thread remains on the surface of the fabric, while the other holds it in place with tacking stitches.
Couching stitch, in the sense of embroidery, is a process that involves laying a section of your thread onto your fabric and stitching it onto your work.
[sc name=”aff_link_7″]
16. Blanket Stitch

A blanket stitch is made to make borders or decorative lines, or as an edge to your embroidery.
This stitch is one of the basic hand embroidery stitches that can be used along the sides of a fabric hem. It can also be a decorative frame or a design to stitch elements in place on an embroidery project.
Starting the blanket stitch is usually the difficult part, but once you get the hang of it, the rest is easy to do. Add variations to the stitch by adjusting the distance and length of the stitches.
17. Bullion Knot

For anyone who loves floral embroidery designs, the bullion knot or the bullion stitch is a must-learn type of embroidery. This will have you producing roses of all kinds on your fabric work!
[sc name=”aff_link_2″]
One of the most advanced embroidery stitch, the bullion knot starts with a basic center and a really long French knot, followed by — you guessed it — bullion knots!
Don't forget to download, save, or share this handy infographic for reference:
![11 Hand Embroidery Stitches Every Sewer Should Know [INFOGRAPHIC]](https://sewing.com/wp-content/uploads/2019/11/20200120-Sewing.com-10-Beginner-Embroidery-Stitches-scaled.jpg)

Give yourself a pat on the back for finally learning how to do these hand embroidery stitches. Practice them, and we're definitely sure you'll get far!
You can create so many original hand embroidery designs with these basics. If your first several attempts didn't turn out right, don't worry.
Just keep practicing and sooner or later, you'll master them all. Happy stitching!
Which of these embroidery stitches do you love doing the most? Share your thoughts with us in the comments section below.
Up Next:
- 15 Awesome Decorative Throw Pillows You Can Sew This Fall
- 15 Easy Infinity Scarf Crochet Ideas For The Cold Season
- 7 Easy Crochet Dress Patterns Free For You To Download
We aim to feature the hottest trends in the sewing world, so get in touch if you can contribute! WRITE FOR US!
Follow us on Facebook, Twitter, Instagram, and Pinterest
Editor's Note: This post was originally published in March 2017, and has been updated for quality and relevancy.